Tag Archives: PHP

Install Ubuntu 16.04 on VirtualBox

The following is a step-by-step run through for installing Ubuntu 16.04 server as a virtual machine running under a Windows 10 host.  Two prerequisites:

Prepare the VirtualBox VM:

Click on “New” to create a new virtual machine: You’ll get this initial screen to choose the operating system you wish to install and choose a name for the your VM.

Ubuntu Install1.jpg

The next screen asks what you want to RAM memory. The recommended memory size is 768MB,  but I’ve had decent luck by boosting this to 4 gigs, (on my 8 gig Windows 10 workstation.).

UbuntuInstallMemory.jpg

Accept the next suggestion to create a virtual hard disk. The default 8GB is fine, because VirtualBox will expand this if necessary.

UbuntuHD.jpg

Accept the default next screen, to choose the file type.

VirtualHardDisk.jpg

… and accept the default “dynamically allocated”

DiskFixedSize.jpg


Finally you can choose the file size:

FileSize.jpg

In this case,  I chose 16 gigabytes.

Once you have completed the screens above, you need to change two other parameters before starting the actual installation:

Under Settings,  change the networking connection to “bridged adapter”

NetworkSettings.jpg

Under storage, point the little CD image to your .iso file.

StorageSettins.jpg


Install Ubuntu 16.04

At this point you are ready to start the VM, and go through installing Ubuntu from the .iso file.  This is the standard Ubuntu installation from here on out… run from a  console command line interface. Terminal.jpg

After making your keyboard and language selections, there are several prompts for additional information:

Choose a HostName: UBSandbox

Choose an initial account: larryk

Choose a login name for this account: larryk

Choose a password: mypassword

Encrypt your  home directory?  No

Set your time zone. Setup will suggest your local timezone and then ask
Is this time zone correct?   Yes

Partitioning Method:  Choose “Use Entire Disk”,  don’t worry about LVN

Select Disk to partition…. choose the defaults.

Write changes to disk? Yes

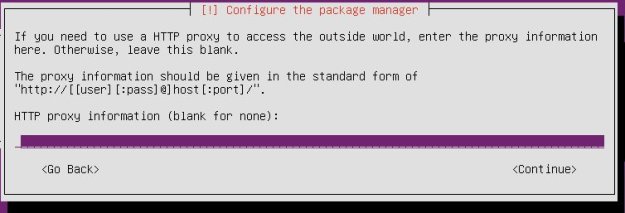
At this point the files are copied to the disk, and the installation continues ore or less on its own for five minutes or so,  then you’ll see a question about the use of an http proxy. This relates to the configuration for the package manager which is used to update the operating system. You can probably ignore this unless you know you are in a corporate environment that uses an http proxy server.

Proxy.jpg

The next screen asks you about updating. I would answer this with the default “no automatic updates”. .

Updates.jpg

Finally there is a screen that allows you to select additional software packages to be installed. I would include the LAMP server, and the OpenSSH server.  LAMP will be the usual Linux+Apache web server + PHP + mySQL

install.jpg

But wait! There’s more!   You will be asked for a password for the  mySQL database. Ignore this at your peril…and choose the same password as you used for your user account at the beginning of your installation.

mysqlpassword.jpg

At this point the installation will run for a few minutes and then …

Will this ever end?   Accept the default ‘Yes” to install the GRUB boot loader.

grubboot.jpg

And then….  we’re done.

alldone.jpg

At this point, you should have a working web server that is running an IP address on your network.  To figure out that address. run ifconfig from the VM console.  In our case we’re at 192.168.219.213

ifconfig.jpg

Looks promising.  Now,  we can open a web browser from our Windows workstation (or any other machine on the network, and we should see the Apache web server home screen.

Screenshot_111816_125839_PM.jpg

We’re ready install WordPress.  Before doing that however, you might create a snapshot* of the current state of the VM.  This means we will always have a backup of the current machine that we can fall back to as we’re experimenting with installing things. If you haven’t already installed Ubuntu three or four times, you can always delete the whole VM and reinstall if you want to start from square 1.


*I know….this is for a future blog post.

Tech Friday: Debugging the WordPress White Screen of Death

motor-1381998_1280Problem: I attempted to change a password for a user of the WordPress web site. I got into the administrator’s dashboard, choose “Users”, found the person’s entry, changed their password, clicked on “save changes” and Poof! I get a blank screen.


It turns out there is a name for such screens, and the name is called the WordPress White Screen of Death, or WSOD.

There are a ton of possible causes for this, but many of them relate to a problem with PHP code located someplace  within WordPress, or within WordPress plugins. Since the WSOD is just that…it doesn’t show any kind of detailed error message, one approach to finding the problem is to enable error checking and display at the PHP level. This is a quick entry in the WordPress wp-config.php file located in the root WordPress directory.  Here’s the file as it shows up in FileZilla.

WP_Config

And here is the contents of the file as displayed in Notepad++

WP_DEBUG

The trick is simply to change false to true to enable the display of error codes.  And sure enough,  once I did that and retried the password change operation I saw the following message:

Fatal error: Call to undefined function curl_init() in /var/www/html/wordpress/wp-content/plugins/gmail-smtp/class.phpmaileroauthgoogle.php on line 171

This was an indication that a plugin which I had added was causing the error. Once I removed the plugin, I could change my user’s password without problems and the WSOD was banished, at least for now.

WordPress: Troubleshooting Contact Forms

Down the rabbit holeI’m trying to get a contact form working on our WordPress site, and it is a little more complicated than I thought it might be.

The contact form plugin itself in WordPress. We’re using Contact Form 7. Documentation for Contact Form 7 says something to the effect “we’re sending upteen zillion eMails a day, and CF form “just works” for everybody.  Well, kinda, sorta. There are several other issues involved:

  • an MTA (mail transfer agent) which maybe (?)  has to be on the WordPress server
  • the php_mail() function which is part of PHP (the programming language for WordPress)
  • the wp_mail() function which may or may not call the php_mail() function
  • Restrictions on to and from addresses.

I wanted to just run everything through our Google Mail SMTP account, but that seems to add an additional layer.  So first I started with our blog site which is on another server, and tested whether the contact form worked there. It actually doesn’t,  that is, it appears to send mail correctly from the users’s perspective, but no email was received anywhere.


Per this note I checked to see if anything was listening on port 25, the usual SMTP port.

$ netstat -tanpl | grep :25
tcp 0 0 127.0.0.1:25 0.0.0.0:* LISTEN 3030/master
tcp6 0 0 ::1:25 :::* LISTEN 3030/master

$ lsof -i :25
COMMAND PID USER FD TYPE DEVICE SIZE/OFF NODE NAME
master 3030 root 12u IPv4 9667 0t0 TCP localhost:smtp (LISTEN)
master 3030 root 13u IPv6 9668 0t0 TCP ip6-localhost:smtp (LISTEN)

Looks promising.  it appears that both IP4 and IP6 are listening.

So, I created a basic PHP script to test at the server command line, and saved this as testphpmail.php. There are three parameters, the receiver’s address, the subject and the body of the message.

//This is a test of the basic PHP eMail function.

<?php
mail('joeblow@blow.com', "Test PHP Mail", "Test mail from PHP Mail");
?>

Run this script from the command line with the following command:

php -f testmail.php

This worked; I received the eMail. It shows that it comes from root.  At least  I knew that at least the fundamentals are in place on the server.

Checking the mail log,  at /var/log/mail.log I see the following:

$ cat/var/log/mail.log
May 20 14:28:17 li239-124 postfix/pickup[28709]: 11864F123: uid=0 from=<root>
May 20 14:28:17 li239-124 postfix/cleanup[28806]: 11864F123: message-id=<20160520142817.11864F123@localhost>
May 20 14:28:17 li239-124 postfix/qmgr[3039]: 11864F123: from=<root@localhost>, size=351, nrcpt=1 (queue active)
May 20 14:28:17 li239-124 postfix/smtp[28808]: 11864F123: to=<lkkg@myserver.org>,
relay=aspmx.l.google.com[173.194.204.27]:25, delay=0.21, delays=0.01/0.01/0.1/0.09, 
dsn=2.0.0, status=sent (250 2.0.0 OK 1463754497 e92si18328547qga.115 - gsmtp)

So this shows that the message was sent, using root@localhost as the sender’s address and my work eMail as the target.  And indeed, I received this email at work.

I checked the log file at /var/log/mail.log which presented various points of interest…including the fact that we are running the Postfix sendmail email server.  But there is also a status=bounced message for IP6.

$ cat /var/log/mail.log 
May 20 13:50:15 li239-124 postfix/pickup[13030]: 2973DF23B: uid=33 from=<www-data>
May 20 13:50:15 li239-124 postfix/cleanup[14078]: 2973DF23B: message-id=<49922f80371c574883b8b8d699f47d9b@blog.kidsgardening.org>
May 20 13:50:15 li239-124 postfix/qmgr[3039]: 2973DF23B: from=<www-data@localhost>, size=869, nrcpt=1 (queue active)
May 20 13:50:15 li239-124 postfix/smtp[14080]: 2973DF23B: to=<lkkg@myserver.org>, relay=aspmx.l.google.com[2607:f8b0:400d:c08::1a]:25, delay=0.41, delays=0.01/0.01/0.09/0.3, dsn=5.7.1, 
status=bounced (host aspmx.l.google.com[2607:f8b0:400d:c08::1a] said: 550-5.7.1 [2600:3c03::f03c:91ff:fe6e:916c] Our system has detected that this 550-5.7.1 message does not meet IPv6 sending guidelines regarding PTR records 550-5.7.1 and authentication. 
Please review 550-5.7.1 https://support.google.com/mail/?p=ipv6_authentication_error for more 550 5.7.1 information. a139si18154032qkc.140 - gsmtp (in reply to end of DATA command))
May 20 13:50:15 li239-124 postfix/cleanup[14078]: 8DAAAF23C: message-id=<20160520135015.8DAAAF23C@localhost>
May 20 13:50:15 li239-124 postfix/bounce[14081]: 2973DF23B: sender non-delivery notification: 8DAAAF23C
May 20 13:50:15 li239-124 postfix/qmgr[3039]: 8DAAAF23C: from=<>, size=3381, nrcpt=1 (queue active)
May 20 13:50:15 li239-124 postfix/qmgr[3039]: 2973DF23B: removed
May 20 13:50:15 li239-124 postfix/local[14082]: 8DAAAF23C: to=<www-data@localhost>, relay=local, delay=0.01, delays=0/0.01/0/0, dsn=2.0.0, status=sent (delivered to mailbox)
May 20 13:50:15 li239-124 postfix/qmgr[3039]: 8DAAAF23C: removed
root@li239-124:~# dpkg -S 'which sendmail'
dpkg-query: no path found matching pattern *which sendmail*.
root@li239-124:~# netstat -tanpl | grep:25
grep:25: command not found
root@li239-124:~# netstat -tanpl | grep :25
tcp 0 0 127.0.0.1:25 0.0.0.0:* LISTEN 3030/master
tcp6 0 0 ::1:25 :::* LISTEN 3030/master

Just to be sure, I ran the PHP script again having it send to my home email address which is outside my work domain.  This bounced and I didn’t receive it at the home address.  Now,  in theory, this might not be a bad thing, since all of the Contact Form 7  messages from the blog page should be sent to an address within the same domain, like customerservice@myserver.com.

So far, then we’ve established:

  • PostFix is installed on the blog’s server.
  • Contact Form 7 shows that it is sending message, but the messages are bouncing.  (Hmm…I wonder what I’ve been missing all those times? )

This is so typical of IT. You think you’re troubleshooting an issue on one server, and upon investigating the same issue on another server that you think is working…you find that it isn’t and down the rabbit hole you go!

WordPress: Fix the File Upload Size Limit

On our WordPress site we want to allow the site manager the ability to upload PDF files which can then be downloaded by our blog viewers. While working out this process we ran into a problem with the file size; any file larger than 2 megabytes was not allowed to be uploaded to the site.

Rather than having this setting located somewhere within WordPress, it turns out that the setting is set by the PHP installation.  (PHP is the language that WordPress is written in, and WordPress the application is written as a series of PHP files).

As I was working through this issue, the first embarrassment was that I couldn’t even find the WordPress installation on my Linux server. Usually WordPress is supposed to be installed somewhere relatively transparent, like the /var/html/wordpress folder. Instead mine was buried under  /srv/www/li999-999.members.linode.com/public_html; somehow related to my virtual host from Linode

As my plumber says, when looking at the latest plumbing problem in our basement, “I wonder why they did that?”  Whatever. The way I finally found this out was to search for the one file that is in every WordPress site; wp-config.php.  I did this by firing up the FileZilla FTP program, and doing a search for remote files.

SearchRemoe

Having found the root directory of my WP installation,  I now needed to find the location of the PHP configuration file. I used a similar search in FileZilla and came up with two php.ini files.  Which was the “real” one?

Actually, I didn’t need to do that. Instead, I needed to get to have a script that calls the phpinfo() function which displays a nice list of all the php configuration parameters. Placed in the root directory of my web server, and then called from a web browser, this script displays all of the inner workings of the php configuration of my site.  Here’s the script:

<?php
// Show all information, defaults to INFO_ALL
phpinfo();

?>

This script is saved as GetPHPInfo.php and copied back to the root directory of the web server.

http://mywebsite/GetPHPInfo.php

Call this script in the web browser and it produces  the following:

PHP1

The above is just the tip of the iceberg. Scrolling waaaay down, I find the following parameter in the “core” section of the page:

php2

That is the size restriction, and it is this parameter that I need to change.  I’m thinking that 12 megs should be plenty.  Looking back up top in the 6th line, I see the “Loaded Configuration File” is located at:  /etc/php5/apache2/php.ini  This is the file I’m going to change. So, its back to FileZilla to find it, download it and edit it in Notepad++

PHPini

I downloaded the wp-config.php file to my local machine using FileZilla.  Then I edited the file using Notepad++. to change the  2M to 12M.  Then I uploaded the file via FileZilla back to the web server.

At this point I needed to reboot the web server, Apache2. Depending on the your installation, there are a couple ways to do this at the command line:

$ sudo /etc/init.d/apache2 restart

Or,  in the case of the lazy systems administrator, I just rebooted the whole server. This takes less than two minutes.

The result is now we can upload files that are a maximum of 12 megabytes in size.

I get to do this on another WordPress server too.  Oh joy!