Category Archives: IT Management

Microsoft for Non-Profits / NGOs

I’ve been getting emails from Microsoft for the past several weeks about a new (?) initiative for non-profits. While it is always a little suspicious about getting help from the Microsoft behemouth (“We’re from Microsoft, and we’re here to help”) its also worth a look. To cut the chase, it looks as if Microsoft is de-emphasizing traditional programs that run on your own computer that you obtain with a perpetual license in favor of pushing people towards their subscription model.

Its not as if we’re not using Microsoft already. Windows, Microsoft Office, and various cloud services from Microsoft already make a lot of sense even before their new push into the non-profit sector.

How much?

Microsoft 365 Business Premium

So, a cursory glance a the the web site, suggests that you can receive all of the services and applications in Microsoft 365 Business Premium for free for up to ten users. The rack rate appears to be $20.00 per user per month….so this is a pretty good deal.

The Premium service also includes the familiar desktop versions of the Microsoft applications, including Outlook, Word, Excel, PowerPoint and Teams. That said, I have been trying the web versions of these applications through my web browser on my aging Mac, and those seem to work reasonably well. The web versions are free to anyone with a “home” Microsoft account, like a hotmail.com account.

Traditionally, our advice has always been to look to TechSoup for heavily discounted software products. It looks like they are on top of the changes that Microsoft is expecting to have in place by April 2022, and they have a detailed discussion of what the program will look like.

Install PowerShell Core on the Mac

My ancient iMac, late 2012,  is still able to use the latest and greatest MacOS. At this writing, it is running MacOS Mojave 10.14.2, and I’m trying to install PowerShell Core 6.0 with Visual Studio Code on the machine.

PowerShell Core 6.0 is the open source cross-platform version of Microsoft PowerShell for Windows, and is available for Windows, Linux and the Mac.  In hindsight,  it might make more sense to test this all out on a Linux virtual machine before mucking up the MacOS.

The first thing to do is to install a package manager called Homebrew on to the Mac. This is the package manager which interfaces with GitHub to fetch the packages necessary for PowerShell.

Homebrew is available at: https://brew.sh    It gives you a command line to insert in the Mac terminal program which runs a script to fetch and install the Homebrew package manager.

Before pasting the command within the terminal prompt, you need to create a terminal session with “elevated” or root permissions.

Start Terminal

type su <your account name>   that is,  the command “su” and you’re user account.

You’ll be prompted for a password,  put in your Mac password.

On my machine this returns a prompt on the command line of bash-d.2$ At this point, I can paste the command below, and Homebrew will be installed.  The installation took about ten minutes.

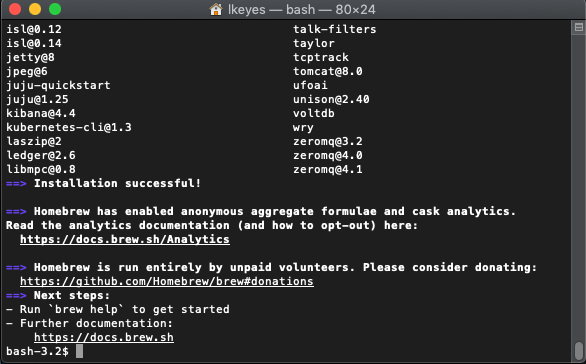
Once the installation is complete,  you’ll see a message within the terminal:

Now that we have the package manager installed, we can go ahead and install Powershell

bash-3.2$ brew cask install powershell

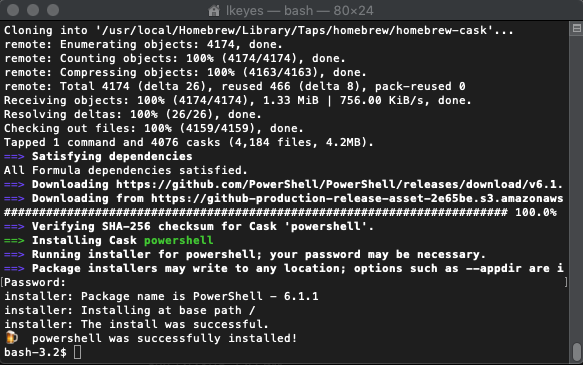
This downloads the files from GitHub  Accoring to the prompts this will be version 6.1.

Once the packages are downloaded,  you’ll be prompted again for the root password:

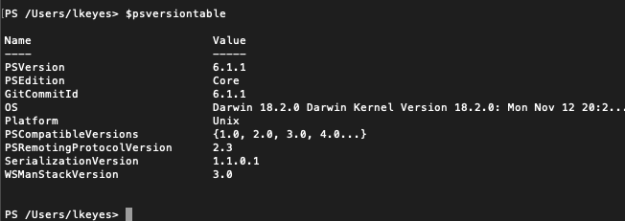
and now, if you type pwsh you can start powershell which returns a prompt PS

type $psversiontable to see the current version.

Moving to the Cloud – with Box Part 1

We’re moving to the cloud with cloud storage for working files. Old news of course,  haven’t we had cloud storage for years already?  Of course… let me count the ways:

  • Adobe Creative Cloud Libraries
  • Apple iDrive
  • Microsoft OneDrive
  • Microsoft Azure
  • Amazon Web Services
  • Google Drive
  • DropBox
  • Box

A quick Google search also shows up some open source solutions that you could install on your Linux server.  But today, we’ll take a look at Box.

The wonderful TechSoup has an offer for Box at the “starter” level  for 10 users for $84.00/year. This is just about right for our workgroup; we currently have 8 full and part-timers on our team, which leaves 2 additional slots available for what we hope we have for growth in the next year. While we do have an office, we are a distributed group. Each full-timer spends a minimum of one day per week outside the office, and our part time employees either work from home, or come in during only part of their week.

What we’re trying to replace here is is an in-office rack-mounted physical server. (remember those?) which sits in a corner of the office roaring away, much as it has for at least ten years. This is a Linux server running the Samba file-management system which is solid and reliable, but a pain to manage. We typically map to drive letters on each person’s workstation:

Drive F: – This letter is mapped to the user’s personal folder on the server. So, my case, my F: drive is mapped to //server/home/larry

Drive U: – This letter is mapped to our “Main” shared folder, under which there are about a dozen departmental or functional sub-folders including Admin, Creative, Editorial, Grants,  etc.

On Linux if you know how Samba works; (and a GUI interface is really helpful…) you can restrict each of the folders to groups of appropriate users. So, for example, you can restrict the HR folder to your bookkeeper,  HR manager and your E.D. There is an additional complication with Samba in that you have to maintain a parallel set of Linux logins and home directories for each Samba user.  Box provides the ability to maintain a similar set of permissions and file restrictions within a web interface. Even thought the “starter” version isn’t as versatile as their full version it still allows you assign individual users as “collaborators” for individual folders.

Other user requirements:

  • Cross-platform availability,  Mac, Windows, iOS, Android
  • Native applications for each platform.
  • Available from anywhere with an internet connection
  • Ability to sync between the cloud and the device.
  • Butt-simple interface that passes the five minute test.

Next time we’ll get into more detail about Box.


Move to the Cloud: About Google Drive.

Everyone wants to store your data. Dropbox, Box, Adobe Creative Cloud, Apple iCloud drive, Microsoft OneDrive, you name it, they want to store it.  Fine. One thing I won’t do here is compare and contrast different applications. I just want to encourage our staff to use a single one.

Since we’ve been using Google Apps for Work in our non-profit organization, (available for free)… it follows that we’re encouraging people to use Google Drive, because of the integration with the all the other Google Stuff, (especially GMail).  A few more reasons:

  1. We use GMail, so once a user is logged into GMail, they are automatically logged into the company’s Google Drive when they connect to their folder, or access  it from within a web browser; no separate log-in is required.
  2. Since any files stored in a user’s Google Drive folder are coupled to their company eMail account, we can ultimately control and access the files.
  3. The user can access the file on any device or from any location.
  4. The user can easily share files with other users, which facilitates collaboration irrespective of time, location or device.
  5. We can create a shared folder hierarchy that mimics our network file server folder structure.  If users have a mapped drive letter on the old system,  you can create a similar mapping for the Google Drive.  For example, our “traditional” setup allocates Drive F: to the users home folder, and Drive U: to our “main” folder which contains all of the subfolders used throughout by the team.

Since we’re not a high-security outfit in terms of the data we’re working with, we acknowledge the preference for convenience and accessibility over the kind of rigorous control and security available when managing user files on a traditional network server.

Install Google Drive on Windows

You can easily drag and drop files to your Google Drive by accessing the drive from within a web browser.  However, there is also a small program that installs a Google Drive folder directly on your workstation.

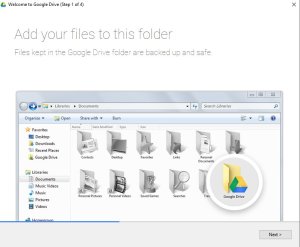
Download the Google Drive application, and run it to begin the installation.

Screenshot_022516_104026_AM

Once the application is run, Google Drive appears as a folder in your normal Windows Explorer folder hierarchy.

Screenshot_022516_104211_AM

Google has a help center for Google Drive that describes most of the issues related to Google Drive.


Archive and Transfer your Google Mail

When an employee leaves your company you may need to archive.

Using the Chrome browser:

1. Sign into your google account.

2. In a new tab, browse to the following address: https://takeout.google.com/settings/takeout/custom/gmail,calendar

3. Follow the wizard.  You can choose to make an archive just of your eMail and calendar, or you can select information from other services such as Google Drive.

4. Once you have selected the services that you want,  click on Next


This shows the file version (zipped),

5. Click on Next again   This starts the archive process.  You can access the archive after it created by clicking on the link that Google sends to your eMail account.

Set default text editor in Ubuntu

I was looking at our crontab on our backup server. This server is an Ubuntu 12.x LTS machine, and the logs for this were being sent to my predecessor, and I wanted to change the eMail address. The usual procedure is to run the following command to see and edit the contents of the crontab file:

crontab -e

This brings up the crontab file for the root user.  Crontab is probably for another day, but basically the script shows a MAILTO address that I wanted to change.

MAILTO=”myusername@mydomain.org”
# Edit this file to introduce tasks to be run by cron.
#  m h  dom mon dow   command
0 23 * * * rsync -avz root@192.168.214.71:/opt/mysql_backup/ /backup/hive
0 18 * * * /backup/scripts/rsync_agave.sh
0 17 * * * /backup/scripts/rsync_basil.sh
0 1  * * * /backup/scripts/rsync_mysql1.sh
0 4  * * * /backup/scripts/rsync_mimic.sh
0 2  * * * /backup/scripts/rsync_petal2.sh

Running the crontab-e opens up the file in the default editor. Well, I didn’t even realize I had a default editor on this machine, and the file opened in vim, which is an archaic program, beloved by Unix freaks.  I prefer the nano editor, especially because I don’t use a text editor much, and I know how nano works.

After some digging it appears that the default editor is set as an environment variable specific to the user.  It can be changed by running the following command:

export EDITOR=nano

You can view your current environment variables, by typing

printenv

There will be a line similar to

EDITOR=nano 

In Ubuntu, you can also use the following command: 

sudo update-alternatives –config editor

This will bring up a list of editors from which you can choose your favorite.

Web Services, REST, Shopify and Brightpearl Part I

Part I.

Background:

I am currently working on a project which involves a Shopify online web store, and the Brightpearl Inventory and CRM system. Both of these cloud-based systems have an Application Programmer’s Interface, (API) which provide a programmatic way to query and manipulate the data that has been entered via the normal web interface. They use these APIs to talk to each other and make them available to programmers who want to create custom functionality or plugins for the systems. Communication with these APIs can be done using a REST compatible client written in PHP, Python, Ruby on Rails, or a host of 3rd-generation languages like C# and Visual Basic.
REST stands for Representational State Transfer. This is the most recent flavor of network programming, similar to SOAP, XML, and XML-RPC, and even good old remote procedure calls.

Use-Case:

I’m looking into a way to extract data from the Brightpearl inventory system; I want to query for each day’s purchases and extract the order number, customer name and shipping information. I want to take this information and format it as an .DBF file for use by the UPS WorldShip program. Note that in this example, I’m interested in being a client of an existing web service, and, for the moment I really just need to query the service for existing data, I don’t need to add or delete records on the server.
To start this odyssey, I’m using my Windows workstation. I’m thinking eventually if I need to have a web server for testing (to run PHP or RAILS for example), that I’ll spin that up as a virtual machine using VirtualBox on Windows with Ubuntu Server as my guest OS with a mySQL backend.
The Brighpearl documentation suggests several tools that can be used to send requests to the API. Perverse as it sounds. I found it was helpful to install no less than three add-ons for FoxFire and Chrome to send the API requests, which enabled learning the mechanics of the process a little easier.
For Chrome:
For FireFox:
Each of these three add-ons allow you to send requests to a web server. Each is slightly different. The Chrome add-on includes a parser for JSON data, which is really helpful when you are working with JSON…which is the case with Brightpearl.
Brightpearl also suggests a book from O’Reilly called RESTful Web Services by Leonard Richardson and Sam Ruby. The book was published in 2007, so although it has some useful information, it is somewhat dated. There is nothing about oAuth in it for example.
 
To get started with the Brightpearl API, you have to make sure that your user account is authorized to work with the API. This is done by accessing the “Staff” under Setup, and making sure that there is a green checkmark next to the user’s name in the API access column. 
Get an Authorization Token
Brightpearl requires that you obtain an authorization token prior to accessing any other requests.  The request for the authorization token takes the form of  a POST request  which includes your user name and password in the request payload. The URI of the payload includes two variables,  your brightpearl server location, the name of your BrightPearl account and a Content-Type of text/xml
Content-Type: text/xml
where
use=”US East”
“microdesign”, is the name of your Brightpearl account id
The user name and password are passed as JSON name pairs to the apiAccountCredentials variable:
{

    apiAccountCredentials:{
        emailAddress:”myname@mydomain.com”,
        password:”mypassword”
    }

}
Note that the double quotes enclosing the eMail address and password are also present.
So, if you look at the raw request that is sent, the full request looks like this:
POST https://ws-use.brightpearl.com/microdesign/authorise
Content-Type: text/xml
{
apiAccountCredentials:{
emailAddress:”myname@mydomain.com”,
        password:”mypassword”    }
}
If the request is successful, you’ll receive a hexedicimal number back which is your authorization token.
{“response”:” xxxxxx-xxxxx-xxxxx-xxxxx-xxxx-xxxxxxxxxx”}
Once you have the authorization token, it is used in subsequent requests as a substitute for your user name and password. The token expires after about 30 minutes of inactivity…so you’ll have to issue another authorization request and obtain a new token after that time. 
Once you have gotten the authorization token, you can start making requests. The basic request is a “resource search” which is a query of the Brightpearl data. Resource searches are issued with GET requests, and must include the API version number. The authorization code is sent as a header along with the request. 
 
As a reminder, the authorization request is a POST, and the resource query is a GET.
(More on resource searches in Brightpearl).
GET https://ws-use.brightpearl.com/2.0.0/microdesign/warehouse-service/goods-note/goods-out-search
brightpearl-auth: xxxxxx-xxxxx-xxxxx-xxxxx-xxxx-xxxxxxxxxx
This request returns a list of the current goods-out notes (Brightpearl’s nomenclature for a packing slip or pick-list).
Example with results: 
The folllowing GET request shows the current orders.
brightpearl-auth: xxxxxx-xxxxx-xxxxx-xxxxx-xxxx-xxxxxxxxxx
This returns a list of current orders, in JSON format. The format shows the structure of the data first, and then the actual records.  Note that there are only three orders!
{“response”:{“metaData”:{“resultsAvailable”:3,”resultsReturned”:3,”firstResult”:1,”lastResult”:3,”columns”:[{“name”:”orderId”,”sortable”:true,”filterable”:true,”reportDataType”:”IDSET”,”required”:false},{“name”:”orderTypeId”,”sortable”:true,”filterable”:true,”reportDataType”:”INTEGER”,”referenceData”:[“orderTypeNames”],”required”:false},{“name”:”contactId”,”sortable”:true,”filterable”:true,”reportDataType”:”INTEGER”,”required”:false},{“name”:”orderStatusId”,”sortable”:true,”filterable”:true,”reportDataType”:”INTEGER”,”referenceData”:[“orderStatusNames”],”required”:false},{“name”:”orderStockStatusId”,”sortable”:true,”filterable”:true,”reportDataType”:”INTEGER”,”referenceData”:[“orderStockStatusNames”],”required”:false},{“name”:”createdOn”,”sortable”:true,”filterable”:true,”reportDataType”:”PERIOD”,”required”:false},{“name”:”createdById”,”sortable”:true,”filterable”:true,”reportDataType”:”INTEGER”,”required”:false},{“name”:”customerRef”,”sortable”:true,”filterable”:true,”reportDataType”:”STRING”,”required”:false},{“name”:”orderPaymentStatusId”,”sortable”:true,”filterable”:true,”reportDataType”:”INTEGER”,”referenceData”:[“orderPaymentStatusNames”],”required”:false}],”sorting”:[{“filterable”:{“name”:”orderId”,”sortable”:true,”filterable”:true,”reportDataType”:”IDSET”,”required”:false},”direction”:”ASC”}]},”results”:[[1,1,207,4,3,”2014-09-18T14:15:50.000-04:00″,4,”#1014″,2],[2,1,207,1,3,”2014-09-29T13:20:52.000-04:00″,4,”#1015″,2],[3,1,207,1,3,”2014-09-29T13:25:39.000-04:00″,4,”#1016″,2]]},”reference”:{“orderTypeNames”:{“1″:”SALES_ORDER”},”orderPaymentStatusNames”:{“2″:”PARTIALLY_PAID”},”orderStatusNames”:{“1″:”Draft / Quote”,”4″:”Invoiced”},”orderStockStatusNames”:{“3″:”All fulfilled”}}}
If you use the “Advanced REST Client Application For Chrome, it will decode the above so that it is readable:
{
response:

{
metaData:

{
resultsAvailable3
resultsReturned3
firstResult1
lastResult3
columns:

[

9]

0:  

{
name: “orderId
sortabletrue
filterabletrue
reportDataType: “IDSET
requiredfalse
}
1:  

{
name: “orderTypeId
sortabletrue
filterabletrue
reportDataType: “INTEGER
referenceData:

[

1]

0:  orderTypeNames
requiredfalse
}
2:  

{
name: “contactId
sortabletrue
filterabletrue
reportDataType: “INTEGER
requiredfalse
}
3:  

{
name: “orderStatusId
sortabletrue
filterabletrue
reportDataType: “INTEGER
referenceData:

[

1]

0:  orderStatusNames
requiredfalse
}
4:  

{
name: “orderStockStatusId
sortabletrue
filterabletrue
reportDataType: “INTEGER
referenceData:

[

1]

0:  orderStockStatusNames
requiredfalse
}
5:  

{
name: “createdOn
sortabletrue
filterabletrue
reportDataType: “PERIOD
requiredfalse
}
6:  

{
name: “createdById
sortabletrue
filterabletrue
reportDataType: “INTEGER
requiredfalse
}
7:  

{
name: “customerRef
sortabletrue
filterabletrue
reportDataType: “STRING
requiredfalse
}
8:  

{
name: “orderPaymentStatusId
sortabletrue
filterabletrue
reportDataType: “INTEGER
referenceData:

[

1]

0:  orderPaymentStatusNames
requiredfalse
}
sorting:

[

1]

0:  

{
filterable:

{
name: “orderId
sortabletrue
filterabletrue
reportDataType: “IDSET
requiredfalse
}
direction: “ASC
}
}
results:

[

3]

0:  

[

9]

0:  1
1:  1
2:  207
3:  4
4:  3
5:  2014-09-18T14:15:50.000-04:00
6:  4
7:  #1014
8:  2
1:  

[

9]

0:  2
1:  1
2:  207
3:  1
4:  3
5:  2014-09-29T13:20:52.000-04:00
6:  4
7:  #1015
8:  2
2:  

[

9]

0:  3
1:  1
2:  207
3:  1
4:  3
5:  2014-09-29T13:25:39.000-04:00
6:  4
7:  #1016
8:  2
}
reference:

{
orderTypeNames:

{
1: “SALES_ORDER
}
orderPaymentStatusNames:

{
2: “PARTIALLY_PAID
}
orderStatusNames:

{
1: “Draft / Quote
4: “Invoiced
}
orderStockStatusNames:

{
3: “All fulfilled
}
}
}

Refurbished Desktop Computers

Refurbs are for when you have more time than money. I’m not sure about the exact figure, but in many cases, I think I’ve ended up spending several hours per unit getting a refurbished computer back online after a hard drive failure, or just having to spend hours updating Windows and Office so that I’m confident getting the machine on the network.

We got several “really good deals” from NewEgg, for refurbished Lenovo desktop computers at $214.00. These appeared to be of “office quality”, included Windows 7 Pro, and were nicely finished. Unfortunately, we have had 2/3 of the Western Digital Blue hard drives start to fail at some point. This has created no end of extra heartache for the users and an enormous amount of work for the IT staff.

NewEgg has been fine on returns, however, providing UPS shipping labels, and RMA procedures over the web.

OK….so much for NewEgg.  We’re looking at alternatives.  (we have more time than money).

Techsoup has Dell refurbished computers that are prepared by a third party. For example:


Dell OptiPlex 755 Core 2 Duo Windows 7 Desktop 2.0 Ghz – 2.6 Ghz 
$286.00 
Min of 160Gb drive
Min of 2Gs RAM 
Windows 7 Professional 64 bit. 
Also includes: 
Office 2010
Adobe Flash,Reader 

One advantage here is that if you need licenses for Windows 7 and Office, they are included in the price. You would spend the $286.00 on those if you bought at retail, and maybe quite a lot less if you have a Microsoft Open, agreement. But, it like getting the hardware free.

The Dell Outlet looks promising with several machines in the $315-$390 range which still include Windows 7 as opposed to Windows 8, and have at least 500Gb drives, and 4 Gigs of RAM. These have more up-to-date processors than the Techsoup machines, and are certainly not as old. Most Dell Outlet machines were either not delivered, or were taken back within the warrenty period.

I’ve had solid results with Dell Outlet computers at the workstation and server level; mixed results with standard desktop machines, and a real disaster with older SX-series Optiplexes.  The best seem to be the larger ones; towers or mini-towers. Smaller machines, “mini-desktops” may have suffer from the suboptimal cooling, and the older components may have reached their design end-of-life earlier than those installed in a larger case.

One thing we have often found is that dual monitors are wonderful, and this is something that I would recommend for anyone as a matter of course. If you need an extra monitor card, these can be found from NewEgg starting at around $35.00. Best to wait until you have received the machine, because there can be variations in the slots, and the available adapter space that aren’t evident from the web page.

On the Mac side, I’ve purchased several Macbooks, iPods, iPads, from the Apple Store. These have always worked flawlessly. The Refurb store has a 21.5 inch iMac for $1099, which is the model from September 2013. The cost is only $200 or so less that of a new, similar iMac. It includes 8 gigs of RAM, and 1 terabyte hard drive, and of course the Mavrick OS, and iWork. If you’ve got more money than time, and just want to get to work, this might be the way to go.

FreeNAS: Automate Drive Mappings for Windows Users

This is the third in a series about FreeNAS, the free network attached storage application which allows you to create an inexpensive but highly capable network file server for backups, iTunes, and general file sharing. Our application is a server for student data. We want to give each student a secure folder in which to store files that they create and use when working in our student computer labs.  The two previous postings are:

Creating a FreeNAS server for student data

Adding students and creating folders 

Note that the first link picks up at the point that the FreeNAS server software has been installed on to server hardware with a minimal configuration. The FreeNAS web site has links to several tutorials as well as the official setup guide.

By the way, FreeNAS installs really nicely within a virtual machine so you can easily test it out. I’ve got it running in Parallels on my MacBook, with software RAID 5 providing redundant disk storage.

Mapping a drive to a student folder

Once I set up the student’s folder and account on the FreeNAS server, I wanted to be able to give them the opportunity to access it from any workstation in our student lab.  The cleanest way I could think of was to create an icon on the desktop which runs a script. The script does the following:
1. Asks for the student login name
2. Asks for the student’s password
3. Maps the H: drive to the student’s folder on the FreeNAS server.

Student folders are named exactly the same as the student login, and they all appear under a shared folder called “StudentData”.  The full path is /mnt/StudentData/.  So, when student Myron Kapoodle logs in with his user name mkapoodle, the script takes him to: 

/mnt/StudentData/mkapoodle

Thus, when the student accesses drive H:, they find themselves in their own folder. They can’t select a folder “above” their own, and they can’t access anyone else’s folder, even if they can see it when browsing around the network neighborhood.

The Script

' VBScript to map a network drive.
' Heavily borrowed from ....
' Guy Thomas http://computerperformance.co.uk/
' Larry Keyes www.techfornonprofits.com
' ------------------------------------------------------'
Option Explicit
Dim strDriveLetter, strRemotePath, strUser, strPassword
Dim objNetwork, objShell, objFSO
Dim CheckDrive, AlreadyConnected, intDrive
strUser=""
strPassword=""

' This section gets the name and password
strUser=InputBox("Enter your User Name")
strPassword=InputBox("Enter your Password")

' The section sets the variables.
strDriveLetter = "H:"
strRemotePath = "\\freenas\StudentData\" & strUser

' This sections creates two objects:
' objShell and objNetwork and counts the drives
Set objShell = WScript.CreateObject("WScript.Shell")
Set objNetwork = WScript.CreateObject("WScript.Network")
Set objFSO = WScript.CreateObject("Scripting.FileSystemObject")
Set CheckDrive = objNetwork.EnumNetworkDrives()

If objFSO.DriveExists(strDriveLetter) Then
objShell.Popup "The H: Drive is already mapped"
objNetwork.RemoveNetworkDrive strDriveLetter
strRemotePath = "\\freenas\StudentData\" & strUser
objNetwork.MapNetworkDrive strDriveLetter, strRemotePath , false, strUser, strPassword
Else
strRemotePath = "\\freenas\StudentData\" & strUser
objNetwork.MapNetworkDrive strDriveLetter, strRemotePath , false, strUser, strPassword
End if

'Section which actually (re)names the Mapped Drive to eliminate naming problem.
Set objShell = CreateObject("Shell.Application")
objShell.NameSpace(strDriveLetter & "\").Self.Name = strUser
Wscript.Echo "Check : "& strDriveLetter & " for " & strUser
WScript.Quit

There is some extra stuff in there that attempts to fix an issue that appeared in Windows 7, where if the drive mapping is reused, it shows up with the name of the previous user.

Our student workstations have a single “student” local account.  Every student logs in to that account when they use the workstation. There are no individual user profiles. In some cases I have the student account log in automatically, and I’ll probably do this on all machines that use the FreeNAS network so that a student doesn’t have to log in twice…once to the desktop and once with their own user name and password on the FreeNAS server.

This script should be installed on each Windows workstation, with a desktop icon to appear on the desktop of the student account.

Two other observations and questions:

1. Obviously you can simply map a drive from the command line using Start->Run->CMD, and then at the prompt  type MAP H: /freeNAS/StudentData/mkapoodle.

2. I searched all over for a more elegant way to have a screen that came up that would ask for the name and password and then make the call to create the drive mapping. First I looked at C#, then, because Visual Basic has a “shell” command, I switched to VB. However that required a full-blown Windows installation of the .exe file, as well as a batch file which was called by the VB program. I finally decided I could live with two windows popping up; one asking for the name and another for the password.

Remote Access via iPhone and iPod Touch

Logmein now has a version of Ignition for the iPhone and the iPod Touch.

Logmein continues to provide terrific value for remote access. We’re using it extensively, with a combination of the free version for most workstations and LogMeIn IT Reach for our servers and critical workstations. Ignition is the desktop client which is slightly more convenient than accessing your Logmein computers from a web page.