Category Archives: Software

Say Hello to ChatGPT with Powershell

ChatGPT, Bard, and other AI models are fun. A good way to dig into their capability and limitations are to access them via their API or applications programming interface. From what I’ve seen, many examples of this are in Python. So far, I hadn’t seen much for Powershell…so I thought it would be interesting to say hello to ChatGPT using Powershell.

Like any API, you need to establish an authorization code which identifies you to the API and which allows billing. The authcode essentially serves as a name and password for your call to ChatGPT. First you have to create an account:

Sign Up for OpenAI API

To sign up for the OpenAI API, visit OpenAI’s website and fill out the form. Once your request is approved, you’ll receive an invitation to join the API.

Get an API Key

After you’ve been accepted into the API, you’ll need to generate an API key. To do this, navigate to the API Dashboard and click on the “Generate API Key” button. Your key will be a string of alphanumeric numbers about 48 characters long.

Choose your model

OpenAI has several different models going back from ChatGPT4. Each model is a little different. Some are supposed to be more suitable for things like chatbots, others are better for searching, and of course the graphic model Dall-E generates (argueably horrible) pictures. For purposes of our sample here…. we’ll use the “text-Davinci-03” model which is an earlier version of the ChatGPT3 series.

Powershell Code to Connect:

The Powershell Code uses the PowerShell Invoke-RestMethod cmdlet, and its use is surprisingly similar to other API calls for other services. Here is the full code:

$headers = @{
‘Content-Type’ = ‘application/json’
‘Authorization’ = ‘Bearer yourAPICodeGoesHere12334455’
}

$body = @{
prompt = ‘Hello ChatGPT!’
temperature = 0.7
model = ‘text-davinci-003’
}

$bodyjson= ConvertTo-Json -inputobject $body

$response = Invoke-RestMethod -Uri ‘https://api.openai.com/v1/completions’ `
-Method ‘POST’ `
-Headers $headers `
-Body $bodyjson


The prompt parameter specifies the text prompt to send to the model. The temperature parameter controls the “creativity” of the response, with higher values generating more novel responses. The model parameter specifies which model to use – in this case, text-davinci-003.

It works! Run the Powershell script, and you’ll get the following:

‘Hi there! How can I help you today?

API Documentation

You can find more information about the text-davinci-003 model in the OpenAI API documentation. The documentation provides details on the available parameters, example responses, and more.

Payment and Charges

It’s worth noting that to use the OpenAI API, you’ll need to provide a payment method and will be charged an initial $5.00. More information on payment and charges can be found on the API pricing page.

Microsoft for Non-Profits / NGOs

I’ve been getting emails from Microsoft for the past several weeks about a new (?) initiative for non-profits. While it is always a little suspicious about getting help from the Microsoft behemouth (“We’re from Microsoft, and we’re here to help”) its also worth a look. To cut the chase, it looks as if Microsoft is de-emphasizing traditional programs that run on your own computer that you obtain with a perpetual license in favor of pushing people towards their subscription model.

Its not as if we’re not using Microsoft already. Windows, Microsoft Office, and various cloud services from Microsoft already make a lot of sense even before their new push into the non-profit sector.

How much?

Microsoft 365 Business Premium

So, a cursory glance a the the web site, suggests that you can receive all of the services and applications in Microsoft 365 Business Premium for free for up to ten users. The rack rate appears to be $20.00 per user per month….so this is a pretty good deal.

The Premium service also includes the familiar desktop versions of the Microsoft applications, including Outlook, Word, Excel, PowerPoint and Teams. That said, I have been trying the web versions of these applications through my web browser on my aging Mac, and those seem to work reasonably well. The web versions are free to anyone with a “home” Microsoft account, like a hotmail.com account.

Traditionally, our advice has always been to look to TechSoup for heavily discounted software products. It looks like they are on top of the changes that Microsoft is expecting to have in place by April 2022, and they have a detailed discussion of what the program will look like.

JSON for PowerShell Part 1

JSON, otherwise known as “Javascript object notation” is a fundamental way of representing key/value pairs. In database terms this translates as a field name (the key) and the field contents (the value).

Let’s show a single contact record in JSON, with two phone numbers, work and home.

{    
"FName":"Myron", 
"Lname":"Kapoodle",
"Address1":"123 Anywhere Lane",
 "Address2":"Apartment 404",
 "City":"BigTown",
  "State":"AZ",
    "Zip":"12345",
    "PhoneNumbers":[       
 {"type":"home","number":"920 234-3424" },
 {"type":"work","number":"920 535-2312"  }
   ]
}

A couple of characteristics:

The complete JSON structure is enclosed in its own curly brackets
If there is more than one record, then the whole structure is contained with square brackets, and the individual records are separated by a comma. This applies to nested records too, as in the case of the two phone numbers for the individual.

Below is the notation for two contact records. In this case, the whole structure is enclosed in square brackets. The individual contact records are enclosed in curly brackets and the two records are separated by a comma.

[    
{"FName":"Myron",
 "Lname":"Kapoodle",
 "Address1":"123 Anywhere Lane",
 "Address2":"Apartment 404",
 "City":"BigTown",
 "State":"AZ",
"Zip":"12345",
"PhoneNumbers":[ {"type":
"home","number":"920 234 3424"},
"type":"work","number":"920 535-2312"}]
}
,
{
"FName":"Myra",
Lname":"Kapoodlova",
"Address1":"123 Anywhere Lane",
"Address2":"Apartment 404",
"City":"BigTown",
"State":"AZ",
"Zip":"12345",
"PhoneNumbers":[ {"typee":
"home","number":"920 234-3424"},
{"type":"work","number":"920 535-2312"}]
}
]

When writing JSON, its helpful to have an automatic checker for syntax. One such is JSONLint at http://jsonlint.com. In Visual Studio Code you can use the Shift-Alt-F within the editor to nicely format JSON code.

The rules of JSON are summarized at JSONLint, but basically include:

  • Keys are enclosed in double quotes.
  • All data elements that are not a boolean or integers are enclosed in double-quotes.
  • Individual entities (i.e. records) are separated by a comma
  • Each key/value pair is separated by a comma
  • Each entity is enclosed by curly brackets.

Since I’m editing JSON in Visual Studio Code, there is more how VSC handles JSON in the Microsoft docs at JSON editing in Visual Studio Code.

Powershell has a two commands that deal directly with JSON.

PS M:\PSFolder> get-command *json*     

CommandType     Name                    Version    Source
-----------     ----                    -------    ------
Cmdlet          ConvertFrom-Json        3.1.0.0    Microsoft.PowerShell.Utility
Cmdlet          ConvertTo-Json          3.1.0.0    Microsoft.PowerShell.Utility


These convert Powershell objects to and from JSON notation. More on that in Part 2.

Install PowerShell Core on the Mac

My ancient iMac, late 2012,  is still able to use the latest and greatest MacOS. At this writing, it is running MacOS Mojave 10.14.2, and I’m trying to install PowerShell Core 6.0 with Visual Studio Code on the machine.

PowerShell Core 6.0 is the open source cross-platform version of Microsoft PowerShell for Windows, and is available for Windows, Linux and the Mac.  In hindsight,  it might make more sense to test this all out on a Linux virtual machine before mucking up the MacOS.

The first thing to do is to install a package manager called Homebrew on to the Mac. This is the package manager which interfaces with GitHub to fetch the packages necessary for PowerShell.

Homebrew is available at: https://brew.sh    It gives you a command line to insert in the Mac terminal program which runs a script to fetch and install the Homebrew package manager.

Before pasting the command within the terminal prompt, you need to create a terminal session with “elevated” or root permissions.

Start Terminal

type su <your account name>   that is,  the command “su” and you’re user account.

You’ll be prompted for a password,  put in your Mac password.

On my machine this returns a prompt on the command line of bash-d.2$ At this point, I can paste the command below, and Homebrew will be installed.  The installation took about ten minutes.

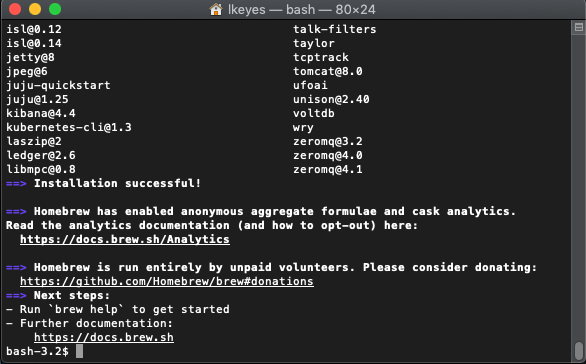
Once the installation is complete,  you’ll see a message within the terminal:

Now that we have the package manager installed, we can go ahead and install Powershell

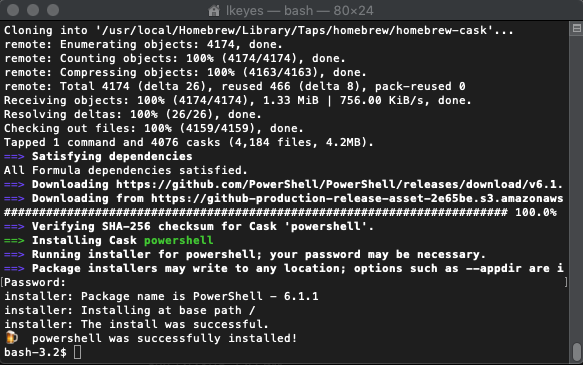
bash-3.2$ brew cask install powershell

This downloads the files from GitHub  Accoring to the prompts this will be version 6.1.

Once the packages are downloaded,  you’ll be prompted again for the root password:

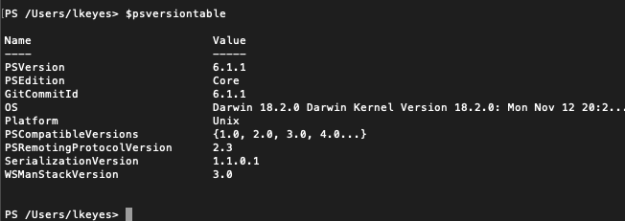
and now, if you type pwsh you can start powershell which returns a prompt PS

type $psversiontable to see the current version.

FileMaker: One to Many Reports

FileMaker is great for putting together a quick form for any number of data-entry chores.  By using a FileMaker portal you can put together a master/detail form that will keep track of transactions based on some kind of header record.  Typical examples include:

  • Invoices and line items
  • Customers and interactions
  • Prospects and sales efforts.
  • Jobs and application sequence.

These forms are especially helpful when you need to keep track of a “pipeline”.   For example when applying for a job, there are multiple steps involved:

  • Applied for the job
  • Received an eMail acknowledgement
  • First phone interview
  • Second phone interview
  • Scheduled live interview

At any one time you may have multiple jobs somewhere in the process, and a typical status report would show a list of each job and its current status.

This brings us  back to the question of displaying the jobs and activities. We’re looking for a “report” which has a list of jobs, and underneath each job the list of activities that have taken place for the job.

JobHunt FileMaker portals display the related records for each master record but a portal almost by definition shows only a specific number of transactions at a time in a scrollable window.  For a printed report, where we want to see all of the related records, we need to define the report without the portal.  This is done using FileMaker’s “sub summary” band when creating the report layout.  The trick is to start defining the report using the transaction table as the basis of the report displaying the fields in the body band and referencing the master table in the sub summary band.  When setting this up,  it looks something like this:

JobHunt2.png

Note the report bands on the extreme left,  with the body band at the bottom, the sub summary above it,  and the report header band at the top.   One clue that the basis of the report is the transaction table is that at the top of the screen, it shows “Table:Transactions” .  Also, the reference to the related field in the subsummary band are prefaced with the double colonon.

The ::RprtHeader  field is actually a calculated field which consists of the employer’s name, and the job being advertised by the employer.  This solves the problem of applying to more than one job at a single employer, in that it effectively provides a unique field name to display the transactions for just one job at a time.


MailChimp: Data mining your subscriber lists.

MailChimp Logo

To find out more about your MailChimp lists, create a segment.

I’m not sure why it took me so long to figure this out, (just dumb, I guess..) but MailChimp actually has a pretty good built-in querying ability directly from the management interface.  It involves the segmenting function, where you create subsets of your list.  MailChimp calls these subsets segments, and the classic use for this is to break up a large list so that you can test different segments by using different subject lines, or mailing times.

From a database perspective, it looks like this:

MailChimp vs. Database
create a segment = create a query
segment = query results, aka a “cursor”
segmenting options = query criteria, aka  an SQL WHERE clause
saved segment = saved query results

In SQL, this would be the equivalent of:

SELECT * FROM <my eMail list> WHERE <my criteria> INTO <my segment>;

The available criteria are fixed, but there are a lot of useful ones. You can combine up to five criteria in a single segment request.  For example, let’s say you want to see how your list is performing. You can query how many subscribers opened:

  • all of your last five campaigns
  • one or more of the last campaigns
  • none of your last campaigns

The criteria are chosen from a convenient drop-down list.

Mailchimp Segment Drop-Down

Mailchimp Segment Drop-Down

To see the results of this query,  click on the  “Preview Segment” button at the bottom of the dialog box.

MailChimp - Segment Results

MailChimp – Segment Results

One thing you may note in the listing above, is a field called “Grade Level”.   We include this field on our MailChimp sign-up form. It will be populated only if we acquired the user through that form and if they choose to give us that information. We also ask for zip code.

The “Contact Rating” field, with the stars, rates the quality of the contact based on their campaign activity and the length of time that they have been on the list. Oddly enough, new acquisitions start out with two stars. If they fail to respond to several campaigns, then they are demoted to one star. These stars are the basis of determining how to pare down your list; eventually you might consider removing 1-star contacts altogether, or sending them a “re-engagement” eMail beforehand. This is well documented on the MailChimp web site. To cut to the chase…  4 and 5 star members are engaged, 3 star members either have low activity, or haven’t been on the list long enough to earn a higher rating.


HeidiSQL+pLink+putty=Joy

Logo for HeidiSQL, a slick GUI front-end for mySQL

After manually changing a hundred blog posts imported with another theme from “published” to “draft”, I figured it was time to actually look at my WordPress database, since we may wish to do some global link updates,  once we get all of the media imported from another blog.  One of the best tools for this on Windows is the wonderful HeidiSQL program.

My Ubuntu server which hosts mySQL wants an SSL connection to accomplish this, so SSL must be used with HeidiSQL. This is done by using a intermediate program called plink which sits between HeidiSQL and Putty (the terminal program for accessing the Linux command line).

I found an explanation of how to use pLink with HeidiSQL.  However, if you can reach the command line using Putty and an SSL connection on port 22,  then you don’t have to do the first part of the instructions, because you already have the server’s certificate installed on your machine. It was cool to be able to verify this in the Windows registry by looking at the registry key.  And then, I was in.

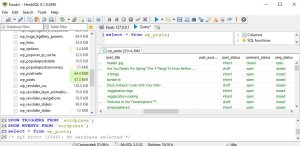
heidisqlscreen


FileMaker 15

filemaker

FileMaker has updated to version 15 for all platforms. This version includes a ton of bug fixes, heightened security, and some internal changes, as opposed to visual changes. In fact it almost looks and acts the same as version 14.

There is a fair amount of grousing going on in the FileMaker forums about the paucity of new features and (yet another) increase in the effective price. I’m afraid that FileMaker is pricing themselves completely out of the low-end market, although a single copy can be had for education or nonprofits for $197 on Amazon. (Regular price $329).  This is a perfectly respectable deal, and you might want to consider at least one copy for end-user database needs especially if you use Macs, or loath Microsoft Access. FileMaker is my database of choice for front-ends for mySQL (via ODBC), managing eMail lists, and creating tables and inspecting data of all kinds.

FileMaker comes with some pre-built database applications called “Starter Solutions”. Some of these  have been updated for version 15.  I did my expense reporting for a recent trip in the Expense solution, and it makes an attractive listing sorted by categories of all your trip expenses.  Here’s the data entry screen.

Screenshot_051716_035903_PM

Here’s the report:

Expense Report

The application can be hosted on FileMaker server and accessed in a web browser, or run within a standalone copy of FileMaker on a Mac or PC, or run on an iPhone or iPad using the free FileMaker Go app.

There is provision for storing an image of each receipt.  If you run the application on an iPad, you can snap a picture of a paper receipt, or enter a bar-code.  Pretty slick!


WordPress: Fix the File Upload Size Limit

On our WordPress site we want to allow the site manager the ability to upload PDF files which can then be downloaded by our blog viewers. While working out this process we ran into a problem with the file size; any file larger than 2 megabytes was not allowed to be uploaded to the site.

Rather than having this setting located somewhere within WordPress, it turns out that the setting is set by the PHP installation.  (PHP is the language that WordPress is written in, and WordPress the application is written as a series of PHP files).

As I was working through this issue, the first embarrassment was that I couldn’t even find the WordPress installation on my Linux server. Usually WordPress is supposed to be installed somewhere relatively transparent, like the /var/html/wordpress folder. Instead mine was buried under  /srv/www/li999-999.members.linode.com/public_html; somehow related to my virtual host from Linode

As my plumber says, when looking at the latest plumbing problem in our basement, “I wonder why they did that?”  Whatever. The way I finally found this out was to search for the one file that is in every WordPress site; wp-config.php.  I did this by firing up the FileZilla FTP program, and doing a search for remote files.

SearchRemoe

Having found the root directory of my WP installation,  I now needed to find the location of the PHP configuration file. I used a similar search in FileZilla and came up with two php.ini files.  Which was the “real” one?

Actually, I didn’t need to do that. Instead, I needed to get to have a script that calls the phpinfo() function which displays a nice list of all the php configuration parameters. Placed in the root directory of my web server, and then called from a web browser, this script displays all of the inner workings of the php configuration of my site.  Here’s the script:

<?php
// Show all information, defaults to INFO_ALL
phpinfo();

?>

This script is saved as GetPHPInfo.php and copied back to the root directory of the web server.

http://mywebsite/GetPHPInfo.php

Call this script in the web browser and it produces  the following:

PHP1

The above is just the tip of the iceberg. Scrolling waaaay down, I find the following parameter in the “core” section of the page:

php2

That is the size restriction, and it is this parameter that I need to change.  I’m thinking that 12 megs should be plenty.  Looking back up top in the 6th line, I see the “Loaded Configuration File” is located at:  /etc/php5/apache2/php.ini  This is the file I’m going to change. So, its back to FileZilla to find it, download it and edit it in Notepad++

PHPini

I downloaded the wp-config.php file to my local machine using FileZilla.  Then I edited the file using Notepad++. to change the  2M to 12M.  Then I uploaded the file via FileZilla back to the web server.

At this point I needed to reboot the web server, Apache2. Depending on the your installation, there are a couple ways to do this at the command line:

$ sudo /etc/init.d/apache2 restart

Or,  in the case of the lazy systems administrator, I just rebooted the whole server. This takes less than two minutes.

The result is now we can upload files that are a maximum of 12 megabytes in size.

I get to do this on another WordPress server too.  Oh joy!

Slack for Non-Profits – EMail is Obsolete!

Back in February I wrote about using Slack for our non-profit organization.  I’ve since introduced this to another organization that I’m a board member for, and it appears to have really taken off for this other group. One thing I hadn’t mentioned last time was the Slack for Non-Profits program, which provides all of the benefits of a paid Slack account to a qualifying non-profit for free. These include:

  • A fully searchable archive with unlimited messages
  • Unlimited external integrations
  • Simple usage statistics
  • Custom message retention policies
  • Guest access
  • Premium support
The first point I should emphasize is that even if you don’t qualify for the non-profit program, Slack is still highly useful. In particular, we were looking for the ability to invite users to our Slack board, without having those users be able to see the entire list of channels. For example,  here is our channel list.

You’ll note that this full list includes the standard default channels, “general”, and “random”.  All of the other channels are related either to committees, or for planning of upcoming events.  The committees include:

  • board
  • fundraising
  • publicity
The planning channels include
  • 2015_fall_concert
  • 50th_anniversary 
  • auditions_2015fall 
You may have gathered that our group is a music group.  We’re actually a semi-professional choral group of 36 acapella singers that sing five centuries of choral music.  
The calendar channel is a special channel. This is an integration which displays calendar events that are entered into our organization’s Google Calendar. You’ll note that the non-profit plan includes “unlimited integrations”. (The free plans include 10 integrations). Integrations are a whole separate discussion, but briefly, they allow events and information from other applications to appear (be copied to) a Slack channel and vice-versa. I’ve used this especially for integrating Trello project management boards with Slack channels. So, for example, I may have a Trello board for a particular grant application, and have additions and changes in the Trello board appear within the fundraising channel. 
Ok.  Back to the other enhancements. An advantage of the non-profit plan is that we’ll be able to create a channel for, say the Concert Committee, and invite all the members of that committee to the channel. Those members can be restricted so that they can’t see the board channel, or indeed any other committees that they aren’t a member of. This is great for us…as we’ll probably end up having channels for each committee, as well as an AllMembers channel for everyone who sings with us.  
The other major advantage of non-profit status is that you can use the enhancements for no cost. I was interested to see that the Slack crew said if we had an actual paid account, we’d be spending US$640.00 per year, and that is just for our current subset of our full membership, (basically the board of directors). By the time we add our committee channels and the rest of our members, we’ll be getting the equivalent of at least double that amount. Not bad for a few minutes of filling out the application.  
What are you waiting for?  Apply for a Non-Profit Slack account now.  You’ll need a 501c(3) letter, testifying that you are granted non-profit status.

And I’d love to hear how you are using Slack in your non-profit; send a note or leave comments.