Last time I talked about freeNAS, the free Network Attached Storage application that allows you to easily create a file server. There are several sites online which have documentation on how to get a freeNAS server up and running. What I hadn’t found was much information about how to create a secure multi-user environment to allow students to save their data. Here are the specs:
1. Students will access the server from a Windows XP or Windows 7 workstation
2. Students will use a mapped drive to access the freeNAS server
3. Students will have their own dedicated folder.
4. Students will be restricted to their own folder, and any subfolders that they create.
5. Students are issued a user name and password for the freeNAS password
Initial steps to prepare the server: using the freeNAS web page
1. Create a mount point on the server. I called mine “StudentData”
2. From the Services Menu, Select CIFS
3. Create a folder share using the StudentData as the name, and the StudentData mount point.
4. From the Access menu create an access group called “Students”.
Using the freeNAS console –
3. Select 6 from menu to get to a shell prompt
4. Change to the “root” of the mounted volume.
cd /mnt/StudentData
5. Allow everyone to traverse the directory, but not to change or execute, only the root (supervisor) can delete or add.
chmod 711 /mnt/StudentData
chown root /mnt/StudentData
Organize the student user names and passwords
1. Get the full name of each student.
2. Assign passwords to each student.
3. Assign the login name for each student. I use the first initial and last name
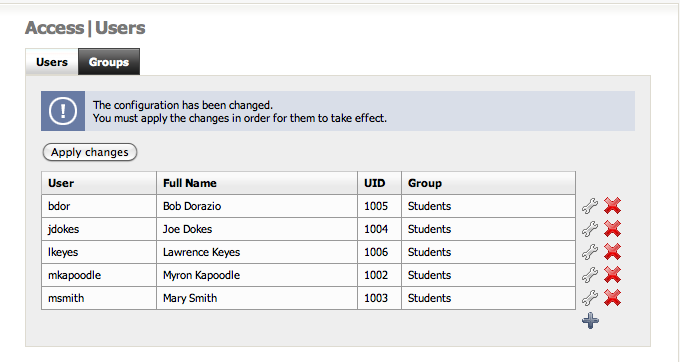
4. Add the student within the Gui under Access : Users and Groups
5. Add the student’s login name, and password
6. Assign the student’s home folder as /mnt/StudentData/ Note that the folder does not have to physically exist yet, although if you want to be able to choose the correct folder from the drop down box, it needs to be created on the disk beforehand.
7. Save changes
8. Be sure to save the changes clicking on the button “Apply Changes”.
At the freeNAS console:
4. Create a folder on the server with the same name as the login name.
Example: I have a student named Myron Kapoodle, this person will get a folder called mkapoodle.
mdir /mnt/StudentData/mkapoodle
5. Give the student ownership of their folder, and allow the owner to read/write/execute within their folder.
chmod 700 /mnt/StudentData/mkapoodle
chown mkapoodle /mnt/StudentData/mkapoodle
6. At this point, the folder should be accessible from the network. For example, from a Windows machine you can map a drive …
MAP H: \\freeNAS\StudentServer\mkapoodle
You’ll have to enter the name and password.
This may not be entirely foolproof in a lab situation with numerous students accessing the same workstation, so I’ve developed at least a partial solution which I’ll outline in a future post.
