Category Archives: Uncategorized

FileMaker Pro V. 11: Desktop Database Redux

Although I periodicallly lament the death of the desktop database program, I now find that I may have exaggerated. Consider FileMaker Pro, one of the earliest database systems available for the Mac, originally sold by an Apple subsidiary, Claris.  Now in version 11, FM Pro comes in several different flavors which work on multiple platforms.

  • Mac 
  • Windows
  • iPad
  • iPhone
  • iPod Touch 

The product for the iOS systems, called FileMaker Go is especially interesting.  It is essentially a runtime version that allows applications developed on either the Mac or Windows computers to run on an iOS mobile platform. What’s more, is that it eliminates the whole issue of learning to write native iOS apps; you develop on the desktop and can deploy directly to the iPad/iPhone.

FileMaker Go is purchased individually for each device from the app store. (I tried asking about volume discounts of 100 devices, but so far haven’t gotten any discount).  Still, considering the cost of developing a native iOS application, the price is pretty reasonable…. $40.00 for the iPad and $20.00 for the iPhone, or iPod Touch.

FileMaker has a server version which allows sharing of data between desktops and mobile devices. I am still finding my way around the desktop and mobile versions, but it looks quite promising.

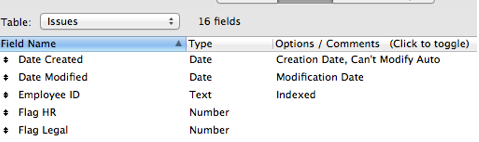
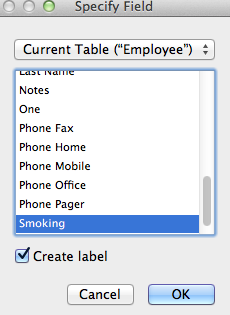
One early project is to convert an existing health-care screening application, written in Access, to FileMaker, to deploy on Windows desktops and iPads. Since the systems analysis has already been done for the Access application, the effort is a straight screen for screen port to FileMaker. While there are a few quirks (radio buttons and checkboxes are especially weird), so far, things are going smoothly.

With almost any development system, I always eventually end up with some kind of show stopper which requires substantial workarounds or research to get past. So far with FileMaker, I’ve been pleasantly surprised. At least on the development side, things that would take hours in Access take minutes in FileMaker, and of course things that would take days using the native Apple iOS development tools are a snap.

Football and Land-Grant Universities

Ripe stuff over at James Howard Kunstler’s blog :

First is the pretense that college football is a character-building endeavor. Rather it’s an odious money-grubbing racket that chews up and spits out quasi-professional players who, with rare exceptions, only pretend to be students. It corrupts everyone connected with it. College football is little more than a giant conduit for vacuuming money out of alumni, hawking brand merchandise, and generating TV revenues. At Penn State, the racket sucked in about $70 million a year net profit. All over America, the old land-grant diploma mills pay their coaches million-dollar salaries, while academic adjunct professors can’t even get health insurance. At SUNY-Albany, the flagship campus of New York’s system, they got rid of the department of foreign languages, but the football team plays on. Meanwhile ordinary students rack up tens of thousands of dollars in unpayable college debt via a related racket in which free-flowing government-backed Sallie Mae loan money prompts colleges to boost tuition rates way beyond inflation rates.

Tech SoupReview of Office 2010

Nice summary from TechSoup of Microsoft Office 2010, and enhancements from the 2007 edition. The one line that really caught my eye.

There are six versions of Office 2010: Starter, Home and Student, Home and Business, Standard, Professional, and Professional Plus.

I haven’t got the time to do the math, but consider the variables…
6 versions of Office 2010
2 versions of Office Web Apps (personal and enterprise)
2 or more versions of SharePoint
2 versions of Word files… doc. and .docX
Employees working with previous versions of Word and Office 2007, and Office 2003
Updates for all the different versions.

equals =

Support nightmare.

It really shouldn’t have to be this difficult or complex.

Filemaker Pro 11: Create boolean checkboxes

How to create a checkbox field in FileMaker Pro. 

For some odd reason, FileMaker Pro does not have a “native” boolean checkbox field. Instead of simply dropping a simple checkbox on to a form (called a layout…in FM Pro),  you have to strictly follow a roundabout procedure to what is a dodle in virtually all other development systems.   
However, in the English version of FM Pro 11,  one of the sample databases; “People Management” contains checkboxes in the “issues” section for two fields: 
These are labeled: 
Is Legal Involved? 
Is HR Involved?  
And the field names in the data table are: 
Flag Legal
Flag HR 
So, for example,  to create a checkbox in the employee record to determine if the person preferred “Smoking”,  (for what….hotel rooms perhaps?)  You can do the following: 
1. In the Value list Editor create a value list named “1” 
Source = Custom Values
Values = “1” 
FileMaker Pro 11 Value Lists 
2. Go to Manage Databases. In your data table,  define the field name for the checkbox field. 
Give it a field type = Number 
The sample shows two fields,  Flag HR and Flag Legal (these field names have spaces in them, which is something I would never do.) 
Database fields for “Issues” table
I created a new field “Smoking” in the Employee table.  Set the type to  “Number” 
OK….so now the table fields have been defined, and lookup value has been defined. Now, what remains is displaying the field in your layout.    
3. On the layout Add  the new field and choose the new Smoking field within the Employee table 
This starts out as a text field… looking like this: 
4. In the Inspector,  edit the properties of the field to change the field type to 
“Checkbox Set”  and change the value list to “1”.   This will make the field look like this: 
5.  Adjust the size of the field to cover up the “1” which makes the field look normal. 
6. Now when you switch to browse you get: 
  
This appears to give a value of “1” when checked,  and I’m a assuming, a ‘null’ or 0 when unchecked.   Anyway, in a query for people who smoke, you’d have to look for smoking =1 
I think.  Not intuitive.   
I’d appreciate comments and corrections from the FM experts.   

Annotated checklist for workstation setup

Notes for deploying Dell Optiplex 270 workstations with Windows XP. The machines are recycled, to be put into a student lab for light web surfing, and word processing. 

Install Windows XP OS
 Partition Hard Drive 
 Install Windows XP SP2 from Dell CD 

The machines originally came with a Dell “reinstall” disk CD, which contained an OEM version of Windows XP SP2. Each machine also has a sticker on the side of the machine, with a hologram that displays a “genuine Microsoft” installation key. 

 First User = “Network Manager” 
 Administrator password =   


 Drivers: Install Intel Chip Set Drivers
 Drivers: Install video drivers —  video will change from 640×480 to something more reasonable
 Drivers: Install network drivers.  

These drivers are available on the Dell support website. You an search based on the Dell service tag. The drivers are downloaded as zipped file, these need to be unzipped, and then the installation folders are copied to the hard drive. From there, you can execute the setup program for each driver.  There will be several reboots required.   

 Install Windows Updates, SP3 and subsequent updates
This is an iterative process, which involves  download, install, reboot. 

Using Internet Explorer, you can choose “Tools” ->”Windows Update” to get to the update web site. You’ll be prompted for installing the latest version of the update plug-in for IE.  Once that is installed, you can return to the same link and start looking for actual Windows updates. 
If the Dell installation disk does not include Windows Service Pack 3,  then this has to be installed and downloaded before installing subsequent updates. 
  Assign the machine name: YBWSx  — Workgroup = Workgroup. 
Do this using the Control Panel – System applet. Change the machine name to something matching your naming conventions. The machine name also shows up within LogMeIn, so make it identifiable if possible. 

Install Security Software  
 Install Microsoft Security Essentials
My current favorite for virus protection.
Create accounts and the network connections.  
 Create user accounts:   labmgr/labpassword with Admin rights, and student/student with normal rights 
 Install FreeNas batch file in C:\FreeNas 
 Create shortcut for Freenas batch file on desktop
This asks the user for a name and password to reach their personal folder on the network. 
 Install  Microsoft Office 2007 Office 2007 
 Install LogMeIn 


Log in under the Student Account: 
Remove icons for OE, Windows Media, etc. on start menu 
Create shortcut for Freenas batch file on desktop
 Pin Word, Excel, icons to start menu
 Change search engine in IE to Google, and home page to Google. 

Finish up
 Create iD stickers and instructional stickers and put on machine.   

Install on site
  Login with admin account
  Install printer(s) 
  Login with student account
  Test MAP H: connection to server

Optional:   
 Create Auto Login for student account
Press WindowsKey+R
In the box type control userpasswords2
select the student account 
check box, allow login without password. 

Windows XP Workstation Setup — Summary

Recycled Dell Optiplex 270 setup  with Windows XP  

Install Windows XP OS
 Partition Hard Drive 
 Install Windows XP SP2 from Dell CD 
 First User = “Network Manager” 
 Administrator password =  
 Drivers: Install Intel Chip Set Drivers
 Drivers: Install video drivers —  video will change from 640×480 to something more reasonable
 Drivers: Install network drivers.  
 Install Windows Updates, SP3 and subsequent updates
  Assign the machine name: YBWSx  — Workgroup = Workgroup 

Install Security Software  
 Install Microsoft Security Essentials
 Create user accounts:   labmgr/labpassword with Admin rights, and student/student with normal rights 
 Install FreeNas batch file in C:\FreeNas 
 Create shortcut for Freenas batch file on desktop
 Install  Microsoft Office 2007 Office 2007
 Install Microsoft Security Essentials 
 Install LogMeIn 


Log in under the Student Account: 
Remove icons for OE, Windows Media, etc. on start menu 
Create shortcut for Freenas batch file on desktop
 Pin Word, Excel, icons to start menu
 Change search engine in IE to Google, and home page to Google. 

Finish up
 Create stickers and put on machine.   

Install on site
  Login with admin account
    Install printer(s) 
    Login with student account
  Test MAP H: connection to server

Optional:   
 Create Auto Login for student account
Press WindowsKey+R
In the box type control userpasswords2
select the student account 
check box, allow login without password. 

Embedding Video within PowerPoint 2007

At work we’ve been puzzling over the use of embedded videos in PowerPoint and after reading through the PowerPoint help files, I found out the following:

There are two ways to play videos within PowerPoint.

1. You can “link” to a movie located somewhere on the web, YouTube for example.
2. “Embedded”, These aren’t really embedded at all, you end up linking to a movie file that is located on the local computer. This means that when you move or eMail a presentation, you have to include the movie file along with the presentation, and place it in the same folder that the presentation is in.

The latter #2 is much more elegant if you can get it to work because, it plays the video locally, (doesn’t require a connection to the internet), probably will play more smoothly, and can easily be set up to play full screen without any extra mouse clicking.

Example. We’re introducing a new program that has the acronym “SASH”.

I create a new presentation called SASHAlive!.pptx which contains the video sashintro.MP4 in the MP4 video format. I save both of these in the folder on our network S drive in a folder called sashvids.

S:\sashvides\SASHAlive!.pptx
S:\sashvids\sashintro.MP4

Now, let’s say this needs to go to the Executive Director’s laptop as a presentation to be given at a conference.
We create a new folder on her laptop on the C: drive. C:\WashingtonConf And we copy our two Sash files, the pptx file, and the mp4 file into that same folder.

C:\WashingtonConf\SASHAlive!.pptx
C:\WashingtonConf\sashintro.MP4

Now when she runs the PowerPoint slides, and the appropriate slide comes up with the video, it will search in the same folder for the video, and play it.

Caveat: The machine used to play the video has to have the proper software. Videos comes in several different formats, among them .MP4, .QTW, .SWF and .ASF. Always, always, test on the machine that is to be used to project the PowerPoint.

Final Caveat: Never expect things to work the first time; they must be tested, especially PowerPoint stuff. It is a cliché that even after millions of PowerPoint presentations, there always seem to be problems on the podium. Speaking from my own experience, nothing undermines a speaker’s confidence more than anxiety about whether or not the bloody PowerPoint is going to work correctly, and adding audio and video just compounds the anxiety. The anxiety can be alleviated by preparation, practice, and rehearsal.

Adding Multiple Users to FreeNAS Part 2 of 2

FreeNas is an elegant free Network Attached Server software that can be installed on an older PC to provide extra storage for media, tunes, files, you-name-it. I’ve been using it for storing student data from our student labs for almost a year. It has worked flawlessly. I”m in the process of setting up another server for another lab, and realized I hadn’t documented my current process for adding users, which I hope I’ll be able to automate further.

This is part 2 of 2. We’ve already eon the following:

1. Figured out the account names and passwords
2. Created the home folders for each account. The folder name matches the account name.

Now we’re going to create the actual student accounts within the web interface.

1. Create a group called students

2. Add the first user.

3. Once all the users are added, there is a final thing to complete. You need to go back into the terminal session and run the fixperms.sh script. What this script does is give ownership of the user’s folder to the user, and deny permission of other users to the folder.

If you get error messages when running the batch files, be sure that you have been painfully consistent regarding upper and lower case in the user names and the folder names. For these to work they must match, and FreeNas is case sensitive, unlike Windows / DOS. To save pain make everything lower case. (Note the screen shots have a mixed case… which I subsequently changed to all lower case).

Adding Multiple Users to FreeNAS Part 1

1. Figure out what the account names and passwords are going to be. For this example, I’m just going to create a bunch of student accounts, with lame passwords, based on colors, viz…

Student01 – Blue
Student02 – Orange
Student03 – Green
Student04 – Brown
Student05 – Gray
Student06 – Red
Student07 – Black

Etc.

2. Using a terminal program, Log into the FreeNas server using the SSH service. (Make sure SSH has been started on the FreeNas server, via the Services tab.) Using the Mac’s terminal program, you can login with the following command:

ssh 192.168.xx.xx -l root

In Windows, use the free PUTTY program, which has provisions for using SSH to log in.

3. Once you are in, change the directory to your shared student volume.

cd /mnt/StudentData

4. Now you need to use a text editor to create a couple of files. The first file is a list of the user accounts.

nano userlist.txt

Add the account names, one per line.

Student01
Student02
Student03
….

Save this file.

5. Now create a shell batch file which creates all of the student folders.

nano makestfolder.sh

#! /bin/sh

while read username
do
echo $username
mkdir $username
done

Save this file as makestfolder.sh

6. Flag the batch file as executable
chmod 755 makestfolder.sh

7. Now you can run this shell script, using the file of user names for input.

./makestfolder.sh <userlist.txt

This will output a list of names of each user. As long as you don’t see anything weird, the folders will also have been created. You can check by simply doing a directory listing.

ls

This should show all of the folders.

8 Finally, you’ll need to create one more shell script, which we’ll use after we’ve added the user accounts to FreeNas.

nano fixperms.sh

#! /bin/sh
while read username
do
echo $username
chmod 711 /mnt/StudentData/$username
chown $username /mnt/StudentData/$username
done

Save this, and again, change the file permissions on it to allow it to be executable.

chmod 755 fixperms.sh

Obviously, creating these two shell scripts is a one-time thing… we’ll reuse them any time we add new folders.

Now, having created your student folders, you can go back into the FreeNas web interface, and actually create the user accounts. When doing this, you assign the “home directory” for the account to the folder that you’ve just created. (See Part 2)

Display Percent on Microsoft Access 2010 forms

Problem with displaying percentages in a Microsoft Access 2010 form. You’d think this would be an easy, and intuitive thing, but different versions of Access handle it different ways.

I have a field for FTE (full-time equivalency) which should be a percentage. So, for example, if a part time worker works three days a week, they are 60% FTE. I want to store this in my Access 2010 contacts table. This turned out to be much more difficult than I anticipated, but one solution which seems to work is the following:

1. In the table design, define the field as Data Type = Number.

Set the field properties as:

Field Size = Double.
Format = Percent
Decimal Places = 0

2. Test this by entering data in table view, and it should display correctly, and also allow you to enter whole numbers. So for 100%, you’ll just enter “100” and for 60% you’ll just enter “60”. It will look like this:

3. Add the FTE field to the form, by dragging it from the “Add Existing Fields” List.