Tag Archives: Windows

Microsoft Small Business Server 2011 — Install Quirks

Well, maybe not quirks exactly, but, there do seem to be a few points of interest.

To review, Microsoft Small Business Server 2011 is a bundled combination of the following:

Windows Server 2008
Microsoft Exchange 2010
Microsoft SharePoint 2010
Microsoft SQL Server 2008

In its usual confusing way, Microsoft can’t offer a single version of this but rather, they have three editions. There is Windows Small Business Server Standard (with the software described above), Windows Small Business Server Essentials (which substitutes cloud versions of SharePoint and Exchange for the bundled server versions that come with Standard). There is also an supplementary Small Business Server Premium Add-On which adds another SQL-Server box for running back-end database applications or web sites. I’ve been working with Standard. This can serve a maximum of 75 users, which I’m sort of assuming means 75 currently connected users, and that you could configure more than that number.

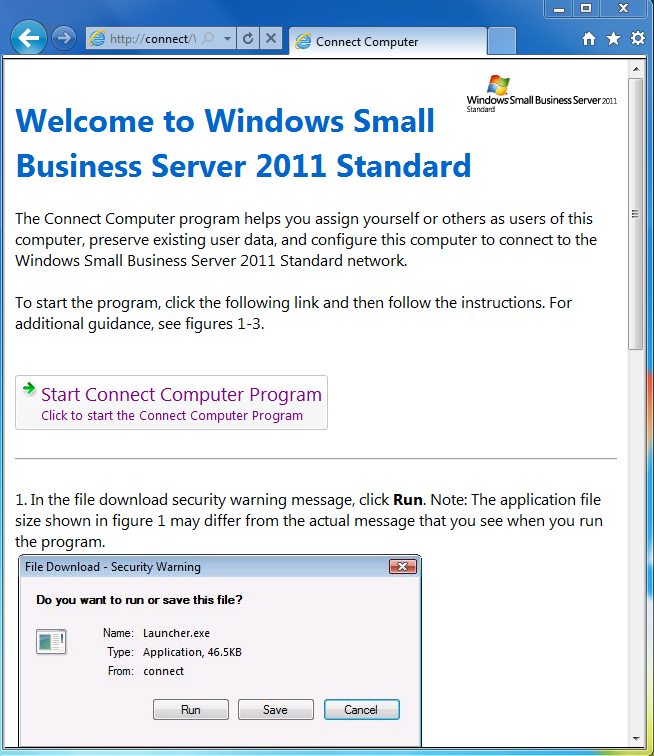
On installation, the SBS server wants to be a DNS server as well as a DHCP server. It is helpful to have the server connected on the LAN, with a working internet connection. If, as in my case, you run a separate DHCP server (the box which doles out IP addresses for workstations as they come online), then you need to disable it temporarily while setting up the SBS machine. Otherwise, SBS will complain and fail to configure its connections to the internet.

Another quirk is that when you first install the operating system everything is installed on drive C: including users shares, Sharepoint folders and Exchange mailboxes. Presumably you’ll want these to reside on a separate set of disks, or partition from the O/S partition, and there is a series of “wizards” that allow you to accomplish this without pain. Once the folders are moved to the data drive or partition, the default new user folders are created in the correct location.

The SBS server must be the top level domain controller in a Windows network. Other Windows servers can be secondary domain controllers but not primary. There is an elaborate multi-page migration methodology which is supposed to allow you to migrate users for SBS 2003 to SBS 2011, however much of the discussion on the technical boards suggests that the migration is a nightmare. So, in the two instances that I’ve been upgrading, I’m starting from scratch. I don’t went to be caught in the middle where the old installation isn’t working and the new one isn’t ready for some unknown or odd reason.

I’m still on the fence as to whether SBS is a good idea. If you’ve already got a POP eMail server going, which has Spam filtering and all the standard features provided by an ISP, managing Exchange on a local server just seems to me to provide an opportunity for additional work and maintenance. It also places all critical applications on a single piece of hardware. On the other hand, Exchange has evolved as a pretty nice calendaring and eMail server, and SharePoint, for those who can use it, works well as an internal knowledge base. SBS includes other tricks, like VPN capability, OutLook web access for accessing your OutLook mailbox from the web, and lots of management wizards which tend to ease some of the burden of maintaining things.

As a practical matter, servers are pretty reliable these days… and you have to go out of your way to practice and rehearse a disaster-recovery scenarios because they just don’t happen that often.

Spicy Server Pix

Shocking! Server Interior Revealed!

Click on the images to see them full size.

Here’s a picture of my new Dell T110 server, with the cover off.

Here’s a little more detail. You can see the two drives mounted on the left hand side, with two conveniently vacant drive bays for a couple additional SATA drives. Upper middle are the four memory slots, each filled with a 2 megabyte chip for a total of eight megabytes. All the black stuff on the right is the shroud covering the heat sink. The unit is absolutely silent.

Finally, here it is in the final configuration. I’ve got an older Maxell external USB 250 megabyte drive as a backup device. The Small Business Server 2011 backup is much improved over Windows backup software that came with earlier Windows server software…almost as good as the Mac Time Machine.

This is the first purpose-bought server that I’ve bought in more than ten years for my business. I had a couple in the nineties. Then for two or three iterations, I’d buy Dell Precision workstations to use as my personal workstation, and then I’d bump them down to be a server. All of these machines have been very reliable. I even used one of the Optiplex GX270 desktops as a production server for more than six months.

Tech Friday: More on Windows Small Business Server 2011

So, after fiddling for a week, I decided to commit, and make the SBS 2011 my real office server, at least for awhile. Amazing how much tweaking is required. Out of the box it doesn’t work out of the box, and despite the presence of numerous wizards and checklists, I find that it requires a fair amount of network knowledge to get things up and running. Ideas:

1. Under the covers, SBS 2011 uses Windows Server 2008, and Microsoft Exchange 2010.

2. In its default state, SBS assumes it will control everything, even unto DHCP. DHCP is usually enabled by default on most routers. It is the function that assigns an internal IP address to each workstation as it comes on the network. I prefer that the function stay with the router, so if the server is off for some reason, workstations can still get a legal IP address to be able to go out on to the internet. For the moment, I’ve acquiesced and given that function to SBS.

3. Since I’m planning to run Exchange, I needed to have a domain assigned to my SBS server. I have a fixed outward facing IP address from Comcast, my internet service provider. I assigned a “third level domain name” to my SBS server. This is often done for individual machines within a domain. So, for example of your company’s domain is kettleprises.com, you mail server might be mail.kettleprises.com, and your sbs server might be sbs.kettleprises.com. Third level domain names do not usually cost extra. I then configured a DNS server on the SBS box using the assigned third-level domain. So far, I haven’t been able to find my domain mapping using nslookup, so I’m a little worried that something is awry.

4. The above is not to be confused with the “windows domain”, which is a single name for the local area network’s SBS machine. I named mine ghq. SBS then translates this to ghq.local which is assigned to the server’s internal ip address.

5. The next issue, is to get the network workstations connected to the server. Before doing that, the help file suggests creating the user accounts on the server. Once you do that, you can go to the individual workstations, and run the web browser, and try to find http://connect. If this is successful, then you’ll see the following screen:

This is only a link to download a “launcher.exe” file which is a script which connects the computer to the network. If there are local user profiles available, it allows you to choose one to migrate to a domain account. (Again, showing essentially that the SBS developers assume that this is the first server of a one-server network, and you would only be migrating local workstation accounts to domain accounts anyway.)

If you can’t bring up the web page, then something is misconfigured, somewhere. It took me several tries to make sure everything was working as expected. I thought the last loose end was the fact that my third level domain name hadn’t propagated yet, but between the time I started writing and the time I’ve finished, it now appears under NSLOOKUP.

Laplink PC Mover migrates Windows Users to new machines

Moving users to new Windows machines is a pain. PC Mover helps automate the process, and it even assists when you are migrating users between Windows versions, such as upgrades from Windows XP to Windows 7.

Despite being lead to believe otherwise, PC Mover does not fully migrate OutLook accounts. Rather it will migrate the account server connection but it does not migrate the OutLook messages. I confirmed this with their technical support people.

You can migrate messages by copying the OutLook.PST file from the old machine to the new machine. I found I had to do this each time I migrated a user from Windows XP to Windows 7 on a new machine. Everything else, however, migrates smoothly. To do this:

1. Make sure the new machine is connected to the network.
2. If you can (or need to) register the computer with the Microsoft Domain Controller (under Control Panel, go to System ->Computer Name, and see that the computer is a member of the domain.
3. Log in to the new computer with the target user’s domain account. This will create a new user profile on the new computer.
4. Log off, and log in again as the Domain Administrator. This will give you rights to perform the migration on the new computer.
5. Install and run PC Mover on the new computer.
6. Log in as an administrator on the old computer.
7. Install PC Mover on the old computer. (I use a thumb drive for this).
8. Run PC Mover on the old computer. It will find the new computer on the network .
9. Choose the user’s domain account on the old computer for migration to the new computer. (This is the reason for step 3 above. Before doing this, I received an error message from PC Mover on the old computer saying that it can’t migrate the domain account. I’m presuming that is because the account didn’t exist on the new computer.)
10. In general, you don’t want to migrate old versions of applications that won’t be used on the new machine. So, these being Dells, I didn’t migrate things like Roxio CD Creator from the old machine to the new one. Also, if you already have applications installed (Office 2007?) on the new machine, you don’t need to migrate the whole application again.

One thing that is helpful is there is a rollback function, so if the migration doesn’t work as expected, you can roll back and try again with different settings.

Tech Friday: Installing Windows Small Business Server 2011

I’ve received  a Dell T110 server, to install here at Microdesign GHQ.  I originally got it with two 250 gigabyte disks, I’ve been fooling around with various images and DVD disks trying several ways of installing it.  Some ideas:

1. SBS 2008 or 2011 requires a minimum of 8 megabytes of RAM, with twelve megabytes recommended for a production server. One reason I broke down and bought new hardware is that I had no recent Windows workstation that I could repurpose that could use more than 4 megabytes of RAM. I tested several candidates using the Crucial on-line tester. Then in desperation I went the Dell web site, and tried there as well. My latest workstation hardware, circa 2005, was too old. 

2. Being a cheapskate, I configured the server with two 250 gigabyte drives, thinking I’d mirror the drives. But it looks like Dell wants 9 megs or so for a utility partition, and that  the Windows installer won’t mirror anything before installation, so the operating system itself will go on a single drive. I’ll configure the second drive for data for starters, and then buy another one to mirror, so that I have mirrored data disks. This is what we ended up doing with the FreeNAS server that we’re using for student data; the O/S is on its own drive. Presumably, if that drive fails, then you could reinstall on a fresh drive, and the data remains intact on its own array. 

The only way around this predicament is to get a RAID controller that does all of the mirroring or RAID in hardware. The controller then “presents” the array as a single drive to the operating system.  

3. The higher RAM requirement also precluded playing with the O/S in a virtual machine… at least with Parallels.  This may be a mixed blessing. Even on dedicated hardware the installation is taking over an hour from DVD. So, in a VM the whole thing would be really slow.

4. Using the technique described last fall  for Windows embedded booting, I’m preparing a USB drive as an alternate boot media, just to see if that works, and if it does if it is any faster. This involves formatting the USB drive, and copying the bootloader files from the Windows setup DVD.

5. The downloaded .iso DVD image for Windows SBS 2011 is larger than the typical 4.7 gigabyte  single-sided DVD. I had to go to Staples and buy double-sided DVDs which hold 8.5 gigs. I never knew they existed, but I’m happy to see that both my Mac Superdrive, and the server DVD reader can read them.

freeNAS File Server for Student Data – Adding Students

Last time I talked about freeNAS, the free Network Attached Storage application that allows you to easily create a file server.  There are several sites online which have documentation on how to get a freeNAS server up and running. What I hadn’t found was much information about how to create a secure multi-user environment to allow students to save their data.  Here are the specs:

1. Students will access the server from a Windows XP or Windows 7 workstation
2. Students will use a mapped drive to access the freeNAS server
3. Students will have their own dedicated folder.
4. Students will be restricted to their own folder, and any subfolders that they create.
5. Students are issued a user name and password for the freeNAS password

Initial steps to prepare the server: using the freeNAS web page
1. Create a mount point on the server.  I called mine “StudentData”
2. From the Services Menu, Select CIFS
3. Create a folder share using the StudentData as the name, and the StudentData mount point.
4. From the Access menu create an access group called “Students”.

Using the freeNAS console –
3. Select 6 from menu to get to a shell prompt
4. Change to the “root” of the mounted volume.
cd /mnt/StudentData
5. Allow everyone to traverse the directory, but not to change or execute, only the root (supervisor) can delete or add.
chmod 711 /mnt/StudentData
chown root /mnt/StudentData

Organize the student user names and passwords
1. Get the full name of each student.
2. Assign passwords to each student.
3. Assign the login name for each student.  I use the first initial and last name
4. Add the student within the Gui under Access : Users and Groups
5. Add the student’s login name, and password
6. Assign the student’s home folder as /mnt/StudentData/ Note that the folder does not have to physically exist yet, although if you want to be able to choose the correct folder from the drop down box, it needs to be created on the disk beforehand. 
7. Save changes
8. Be sure to save the changes clicking on the button “Apply Changes”.

At the freeNAS console:
4. Create a folder on the server with the same name as the login name.
Example: I have a student named Myron Kapoodle, this person will get a folder called mkapoodle.

mdir /mnt/StudentData/mkapoodle

5. Give the student ownership of their folder, and allow the owner to read/write/execute within their folder.

chmod 700 /mnt/StudentData/mkapoodle
chown mkapoodle /mnt/StudentData/mkapoodle

6. At this point, the folder should be accessible from the network.  For example, from a Windows machine you can map a drive …

MAP H: \\freeNAS\StudentServer\mkapoodle
You’ll have to enter the name and password.
This may not be entirely foolproof in a lab situation with numerous students accessing the same workstation, so I’ve developed at least a partial solution which I’ll outline in a future post.

freeNAS File Server for Student Data

FreeNAS is an open source file server program based on BSD Unix. It is available as an .ISO file for downloading and burning to a CD. It will work in 256Kb of memory. While freeNAS is ideal as a “home” server using an older PC, it scales to modern server hardware. Out of the box it provides software RAID (provision for redundant disks) and it can work as a server for Windows, Apple Macintoshes, or Linux workstations. There are several installation guides available, and you can have a basic Windows server up and running within thirty minutes. Here’s a look at the opening screen in the web management program. (Click the image to enlarge).

I’ve  installed it twice; once within a Parallels virtual machine on my MacBook Pro, and once on an older Dell Optiplex G270.

We are considering using freeNAS as a server for student work within one of our learning centers. Currently, students are save their files on USB thumb drives, but that seems to be a poor solution; the drives get lost, or infected with viruses. We don’t want the students on the “administration” network, so we are looking for alternatives. FreeNAS seems to be a good alternative to another Windows server. Our plan is to give students accounts on a FreeNAS server, which will give them a single folder that they can access from Windows XP and Windows 7 desktop machines, or Windows 7 laptops over a wireless network.

Most installation guides assume you are creating a home server for Windows workstations, and they bring you to the point to where any workstation can find the server, connect to it and store files. Our application requires that individual students have their own folder on the server, and that they cannot access anything else outside of that folder.  Further, we want the student to be able to log into the server independently of the local Windows workstation account. We don’t want to create separate profiles on each workstation for each student, because their is no guarantee that the student logs into the server from the same workstation each time.  The plan is to have the student map a drive letter to their freeNAS folder using a connection script that automates the NET USE command.

In addition to the link above, there is another more detailed installation guide at daily-cup-of-tech.

Odds and Sods

Windows 7

The curse of Windows 7 is that it is available in too many versions. There is the “Home” version and the “Professional” version. The difference here is professional can connect to a Windows domain as a member computer. Not a big deal. Windows Home can still cannect to windows shared folders, and pretty much act as usual.

Then there are 32 bit and 64 bit versions of both Home and Professional. The only advantage of the 64 bit version is that it can address more than 4 megabytes of RAM. Even with today’s bloatware, 4 megs is quite sufficient for virtually any purpose except perhaps 3d imaging, or video editing.

So when our recent laptops showed up with Home 64 bit, it seemed a bit of overkill. Not a major problem, but the other disadvantage of 64 bit is that it requires its own hardware drivers. Any printer, for example, will have to have a 64 bit driver. (If you don’t have it….you’re out of luck with that printer!).

The upshot is for any machine that is not going to be part of a Windows domain network…. Windows 7 Home 32 bit is probably going to be the best and least expensive solution. Another explanation is available here.

Windows 7 on the MacBook

After much fiddling, probably counted in the days… I seem to have gotten Windows 7 to work acceptibly on my MacBook with 2 megs of RAM. This was something I always thought should work, since Windows XP and Windows Vista both seemed to work pretty well. So, here is a highly unscientific description of what is working now.

Windows 7 Professional
Parallels V5.

Win 7 is installed in a boot camp partition, and then run via Parallels. I’ve turned of the Aero screen effects, reverting back to a “Windows 7 Basic” theme. I also turned off the sidebar and gadgets within Windows, (no great loss as these are already present on the Mac). Parallels allocates 1 meg for Windows. One quirk is that if attempt to use Windows full screen, there is an odd black box….looks like it could be a dialog box, or Flash ad, appearing and disappearing in the center of the desktop or any application. So, somehow is this an issue of a piece of video memory getting addressed?

Windows 7 64 bit Setup Quirks

I’m setting up five laptops for use as classroom machines. Five is certainly beginning to approach the cusp of wishing that we had some kind of imaging software that would allow a single setup to be cloned to the other machines. These are Inspiron machines from Dell which cost about $650 (including Windows 7 Home Premium 64 bit). The hardware is OK…they come as a glossy black plastic machine with a typical full-sized Dell keyboard and a very adequate 15″ screen. While configuring, I installed a wireless Microsoft mouse, but the touchpad works well too.

The machines come with a 64bit version of Windows. The main advantage of this is that the machine can comfortably address more than 4 gigabytes of RAM. It doesn’t appear to speed things up at all, and indeed the machine takes forever to log off, (two-three minutes) and reboot, and the login also takes more than 30 seconds. Another disadvantage is that the 64 bit version of Windows requires 64-bit drivers for any hardware (such as printers), which can be an inconvenience when tracking down printer drivers. So, as a recommendation, the 64 bit version of Windows does not appear to have any advantage for an ordinary user, and indeed may even have additional disadvantages.

There is a batch script which asks for the name of the initial user account. On a couple machines this appeared to go forward after accepting a couple characters…. and there is no “back” button. So, the machine inadvertently creates a lame account name. When changing the account name, it doesn’t change the folder that the account uses, so now I’m stuck with an account called Student which has a local folder called Studnet.

Dell has made something of the fact that it doesn’t install a lot of crapware on its machine anymore, and indeed we don’t have to remove AOL. Still, there is an amazing array of tweaks to apply, and still a surprising amount of software to remove, much of it from Dell, but also default software from Windows. The default installation comes with a variety of pop-ups (Macaffee, Dell system restore,) and an almost constant stream of messages about the virus status, Silverlight updates, etc. Here is our current list of changes:

1. Change Desktop Theme back to Windows default
2. Reassign computer name — Requires reboot
3. Uninstall Dell Dock
4. Uninstall GoToAssist
6. Uninstall Windows Live
7. Uninstall Windows Live Additional Components
5. Uninstall McAffee anti-virus, etc., etc. (requires a restart) (takes a long time.)

6. Install Microsoft Office 2007
Add the 25 character Product Key
Customize — not available: Access, Office InfoPath, Outlook
Open up Word: Accept Updates

In Internet Explorer
7. Change home page
8. Change Search Provider from BING to Google
9. Download and install updates
10. Download and install Windows Security Essentials
Requires an update to SilverLight
Does a long scan
11. Open a PDF file to get rid of initial issue with licensing Adobe Acrobat
12. Install Logmein

The upshot is that it is really over with Windows XP and that is OK. Windows 7 seems to be better and more secure on many counts. Windows Security Essentials appears to be a great alternative to third-party virus scanner and malware scanners. Setup is still a pain; I think I’m averaging about 1.5 hours per machine….and even at the point that I’ve got them set up here, I have to take them to their ultimate end-site, and install the wireless networking and printer drivers for the local site.

The $30.00 Windows XP Computer.

Based on Jeff Duntemann’s suggestion about the SX270 I went on eBay and bought both an SX270 and an SX280. I bid and got the 270 for $30.00, however, the vendor required a shipping fee of $30.00 for UPS ground which I think is a bit of a ripoff. Still, $60.00 isn’t bad (potentially) for a working more-or-less modern computer. For those who have more time than money, who want to try this route, here are a few additional tips.

1. All eBay Dell SX270s are not equal. Many are stripped of their hard drives. This is presumably for security reasons. If yours does have a drive, it will probably have been wiped, so it will need an operating system.

2. Many of the SX270s have what is called a COA sticker included. Sometimes this is simply described as “COA included”. This gives you a Windows license key. You still need to be able to install a copy of Windows, so you need to have a CD lying around, and typically this needs to be a single user copy. (I tried installing using the media from our site license. This wouldn’t accept the COA as it the one on the sticker wasn’t a “volume license” number. I also tried using an old Microsoft Action Pack version of the Windows media and this didn’t want to accept the number either. All this nonwithstanding the fact that I *do* have a legitimate Windows XP COA number to input during the installation process. The best solution proved to be a Dell Windows XP “operating system reinstallation disk” of which I have several lying around from previous new Dell machine purchases.

3. Both the SX270 ad SX280 have power bricks, similar or larger to those that you find on inexpensive ink jet printers and laptops. These are by no means generic and you need to be sure you have the right one to fit the machine. The eBay listing may or may not include the power brick….if it doesn’t you’ll be out another $10-$30.00. I was unlucky, but managed to get a Buy-it-Now brick for $10.00 (plus shipping of, I think $6.00). So, my $30.00 computer now costs $73.00.

4. My machine arrived in reasonably good shape; but was dusty. The CD drive wouldn’t read a CD correctly. I bought a CD cleaner disk from Amazon, and that seemed to fix the reading problem; but if it hadn’t the PITA factor would have gone up considerably as I’d have to replace the CD drive.

5. Once Windows was installed, I downloaded the network drivers from the Dell site, using another machine… and installed these on the SX270.

Then there is the inevitable faffing about trying to find video drivers for the unit. Wouldn’t it be nice if there was a utility that would contain all of the drivers necessary, and that would install them in one batch file? Anyway, according to the discussion on the Dell web site, drivers should be installed in the following order:

  1. System driver file…either desktop or laptop. (I never found this for the SX270)
  2. Chipset (motherboard driver) requires a reboot.
  3. Video driver. requires a reboot.
  4. Network driver (already got that, otherwise, I wouldn’t be able to download directly to the SX270)
  5. Audio drivers.

When Windows was first installed, the machine wouldn’t produce any screen resolution higher than 600×480. Once the video driver was installed, it went to 1600×1200 automatically. Pretty dramatic.

Looking at the specifications on the Dell site, it says that this machine is actually an SX270N. I’m not sure what the difference is between an N and a non-N.

The fan is noisy. Too noisy. Like the wind in Wuthering Heights. The fan noise diminished when I placed the unit on end, with the vent holes in the top. I’ll also attempt to peel off a label that the bonehead vendor stuck on the top thereby covering about 20% of the ventilation holes….maybe that will improve the air circulation and keep the machine cooler.